After proper arrangement, use some system of
Methods of Applying Glue
marking the pieces of stock. This is so they will not
be disarranged during the gluing-up process. Apply
When you need thicker or wider material but it
is not available, you will have to glue several pieces
a good coat of glue to the surface of the piece of
stock lying face up. Place one of the other pieces of
of material together. The two principal methods
stock face-to-face with the glued surface. Rub back
used for gluing wood stock are face-to-face gluing
and forth or in a circular motion. Exert as much
and edge-to-edge gluing.
down pressure as possible. This spreads the glue
evenly throughout the joint and helps prevent air
In face-to-face gluing, first determine the sizes
bubbles. In addition, a certain amount of glue is
of stock needed. Then, you should decide what
driven into the pores of the wood. The glued
available stock can be glued up to produce the
surfaces are pulled closer together. Repeat the
required size. Remove enough lumber from the
rack to do the job. Saw the lumber to the required
preceding gluing operations until all pieces are
lengths. Dress one face and one edge of each piece
assembled
of material on the jointer. Dress the material to the
proper thickness in the planer. Rip the pieces to
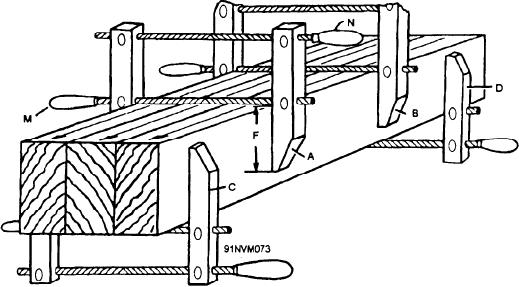
Position clamps and tighten glued-up stock as
the proper width in the circular saw. Adjust the
shown in figure 3-47. Place clamp A in a position
hand clamps to an approximate jaw opening. Lay
so that when the clamps are all in place, the space
the stock on the bench and fit each clamp loosely
between them will be somewhat equal throughout
over the stock. Then place them in a spot where
the length of the material. Keep lower clamp
they can be easily reached.
spindle M at least 1/2 inch above the surface of the
material. Tighten up on spindle M and release
Place the stock in the desired gluing position.
spindle N until a fair amount of pressure is on that
Alternate in relation to the growth rings. The
part of the jaws near M. Next, turn spindles M and
warpage of each piece offsets the warpage of the
N until the entire face of jaw F is exerting an even
one next to it if this arrangement is followed. Also,
pressure on the face of the material. Use enough
arrange the pieces so the grain of their respective
force to squeeze excess glue from the joints of the
surfaces runs in the same direction. Otherwise,
glued-up stock and draw all surfaces tightly together.
difficulties may arise later when dressing the job to
proper thickness. Planing with the grain on one
Adjust and tighten clamp B just like clamp A.
part of the surface may prove to be the wrong
As each clamp is added, the glue is forced along, as
direction for an adjacent area.
well as out of, the joint. If the ends are clamped
first, a large amount of glue is trapped in the
Figure 3-47.--Face-to-face gluing.
3-31

