nominal pipe size of 3 inches has an actual measured
DIA
Wall
ID
Schedule
OD
OD of 3.50 inches. A pipe with a nominal pipe size
4
40
4.500
4.026
0.237
(NPS) of 2 inches has an actual measured OD of 2.375
inches. For pipe that is 12 inches or larger, the NPS and
4
80
4.500
3.826
0.337
the actual measured OD are the same. For example, a
pipe with an NPS of 14 inches has an actual measured
120
4
4.500
0.438
3.624
OD of 14 inches. Nominal dimensions are used to
simplify the standardization of pipe fittings and pipe
4
160
4.500
0.531
3.438
taps and threading dies.
Therefore, you can use a pipe schedule to select
The wall thickness of pipe is identified by reference
either a greater or smaller pipe thickness depending on
to wall thickness schedules established by the American
the requirements of the job.
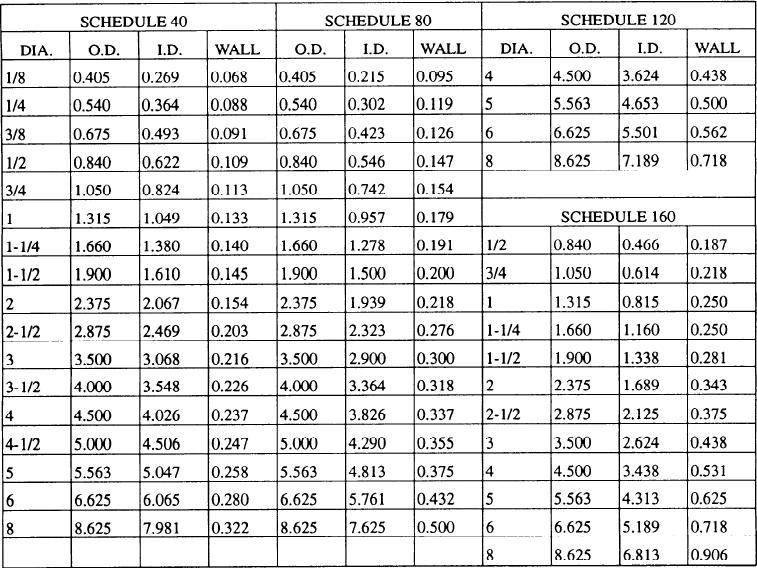
Standards Association. As an example, table 15-1
shows four schedules: 40, 80, 120, and 160. Each of
You may have seen pipe identified as STANDARD
these schedules shows a different wall thickness and,
(Std), EXTRA STRONG (XS), and DOUBLE EXTRA
therefore, a different ID for any given NPS.
STRONG (XXS). These designations also refer to wall
thickness. Figure 15-1 shows the relative wall
Assume that you have a pipe with a nominal size of
thickness of pipes having the same NPS (OD). Note
4 inches. Using table 15-1, you can see that a 4-inch
that the ID is reduced as the wall thickness is increased.
pipe can have the following ID and OD dimensions.
Pipe is manufactured in a number of different wall
Table 15-1.--Schedule Designations of Pipe Size
15-2

