importance. Some of the more important aspects of
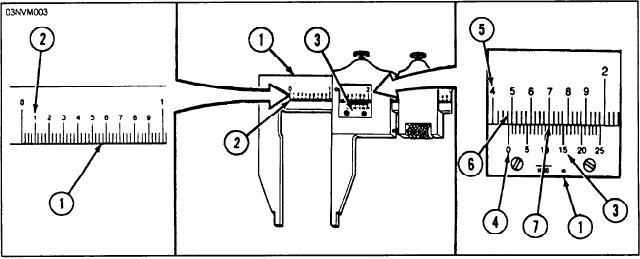
dial caliper (refer to fig. 5-3). The main frame scale (1)
caliper maintenance are listed as follows:
is graduated in 0.025 thousandths of an inch. Every
fourth division (2) (representing a tenth of an inch) is
-- Always store the caliper in its carrying case.
numbered. The vernier scale (3). on the movable jaw, is
Never leave calipers on work benches, table tops, weld
divided into 25 parts and numbered 0, 5, 10, 15, 20, and
booths, machinery or equipment, or other areas where
25. These 25 parts are equal to 24 parts on the main
the caliper could be knocked off, crushed, bent, or
frame scale (1). The difference between the width of one
otherwise damaged.
of the 25 spaces on the vernier scale (3) and one of the
24 spaces on the main frame scale (1) is 1/1000 of an
-- Calipers should always be calibrated according
inch.
to the Navy's METCAL program before use.
There are five steps to reading the vernier caliper
as shown in figure 5-3. They are as follows:
-- Keep the slide and main frame clean and free
of dust, dirt, weld splatter, and metal chips.
1. Read the number of whole inches on the top
scale (1) to the left of the vernier zero index (4)
-- Never force the slide. If the slide does not move
and record as 1.000 inch.
freely, check for chips or grit on the rack and remove
2. Read the number of tenths (5) to the left of the
them by cleaning.
vernier zero index (4) and record as 0.400 inch.
GAUGES
3. Read the number of twenty-fifths (6) between
the tenths mark (5) and the vernier zero index
There are numerous gauges in use throughout the
(4) and record as 3 0.025 or 0.075 inch.
Navy today. As an HT, you will use numerous gauges
4. Read the highest line on the vernier scale (3)
to perform your job. This section will discuss various
which lines up with the lines on the top scale (7)
gauges that are used in drilling, tapping, welding, and
and record as 11/25 or 0.011 inch. (Remember,
brazing operations.
1/25 = 0.001 inch.)
5. Add the total measurement of the 4 preceding
Thickness (Feeler) Gauges
steps to find the total measured length or 1.000
+ 0.400 + 0.075 + 0.011 = 1.486 inches.
Feeler gauges are used for checking and measuring
small openings such as root openings and narrow slots
Vernier calipers only take inside and outside
found in weld fitups and braze joints. Thickness gauges
dimensions and cannot take depth readings.
come in many shapes and sizes, as shown in figure 5-4,
and can be made with multiple blades (usually have 2
Caliper Maintenance
to 26). Each blade is a specific number of thousandths
of an inch thick. This enables the application of one tool
Since calipers are precision measuring instru-
to the measurement of a variety of thicknesses. Two or
ments, proper care of the caliper is of great
Figure 5-3.--Reading a vernier caliper.
5-4

