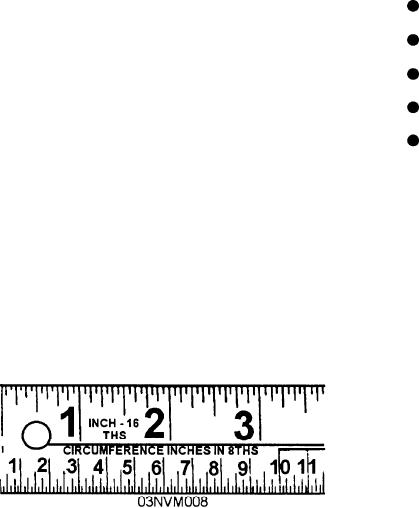
directly below that mark to get the total length of plate
to designate drill size. Some drill gauges may use a
needed to manufacture a 2-inch diameter cylinder or
combination of these designations to measure drill size.
6 1/4 inches. The total length of plate needed is 6 1/4
You will use these gauges when determining the correct
inches.
drill size for a given tap size.
Steel Plate and Sheet Metal Gauge
SQUARES
Steel plate and sheet metal gauges come in various
Working in an HT shop, you will use a square
sizes and uses, as shown in figure 5-7. You will use them
almost everyday. Squares are versatile instruments
extensively in sheet metal and structural metal fabrica-
that can be used to lay out lines and angles, to measure
tion to determine metal thickness or gauge. They are
distances, and for numerous other functions. There are
simple to use and extremely accurate. Simply fit the
numerous squares in use today, but only the steel
gauge to the plate so that the metal edge slides exactly
square and the combination square will be discussed
into the slot. The gauge should be snug, but do not force
in this section.
the gauge onto the metal. Gauge numbers are marked
on the front of the gauge with the corresponding deci-
Steel Square
mal reading on the back.
Steel squares (fig. 5-9) are used to lay out various
CIRCUMFERENCE RULE
angles and to check squareness or straightness of an
The circumference rule is a specialty rule that is
edge or surface. They are L-shaped tools that comes in
used to figure out the total length of plate needed for
12-, 18-, and 24-inch blade length. They are marked in
manufacturing cylindrical objects. The circumference
graduations of 1-16- or 1/8-inch divisions on the inside
rule looks similar to a regular steel rule but has two
and outside edge. The components of the steel square
scales marked on its face as shown in figure 5-8. The
are as follows:
top scale is an inch scale that is divided in sixteenths
BLADE--the longer leg of the square
of an inch and represents the diameter of an object.
The bottom scale is divided in eighths of an inch and
TONGUE--the shorter leg of the square
represents the circumference of a cylinder. The back
of the rule usually has formulas for calculating
HEEL--the outside comer
circumferences and shows areas and tables for laying
out measurements.
FACE--the inside edge of the square
Reading the circumference rule is a simple process
BACK--the outside edge of the blade
that requires no special math skills. First, determine
When using a steel square to lay out angles, place
the diameter of a cylinder in inches. Next, locate the
the tongue of the square on the base line with the
diameter on the top inch scale and read the
12-inch mark on the vertex of the desired angle. Mark
measurement directly below on the circumference
the vertical distance for the desired angle along the
scale to determine the total length of material needed
blade edge of the square. Connect the vertex to the
to fabricate the cylinder.
vertical height mark with a line. Some of the more
Using figure 5-8 as a guide, let's figure the total
common angles are shown in figure 5-10.
length of plate needed to manufacture a 2-inch
diameter cylinder. Locate the diameter, or 2 inches, on
Combination Square
the top inch scale, then read the circumference rule
The combination square (fig. 5-11) is a
multifunctional tool that can be used to lay out various
angles, measure height and depth, bisect a 90-degree
angle, and as a level. It consists of the following
components:
-- A 12-inch stainless steel rule (1) that is gradu-
ated in eighths, sixteenths, thirty-seconds, and sixty-
fourths of an inch. The rule is slotted to accept
individual tool heads. It can be used as a measuring
Figure 5-8.--Circumference rule.
5-7

