triangular set of paired dump arms. The other two angles
of the arms are hinged to the bucket cylinder rod and to
the dipper stick.
Dump arms supply the required around-a-curve
reach and prevent the cylinder from being pulled in
against the dipper stick when extending. The arm is
necessary, because the bucket has such an extended arc
of rotary movement around the dipper stick hinge that
the piston arm could not follow it. When the hydraulic
cylinder is extended, the bucket teeth move inward in a
curling or digging motion. When the hydraulic cylinder
is retracted, the bucket dumps, opens, or extends.
Bucket
The bucket can be attached to the bucket mounting
in a variety of ways. One way is the slow process of
removing cotter pins and manually driving out hinge
pins to change the attachment. Another way is a
“quick-latch” mounting where the pins are retained in
the attachment and the quick-latch mounting latches on
the pins and is secured to the attachment by a large bolt.
A third way is a quick disconnect that uses hydraulic
controlled locking pins that the operator controls from
the cab.
Buckets are supplied in a number of widths, ranging
from 24 to 59 inches or more. A bucket is usually slightly
wider at the opening to reduce friction at the sides when
digging and to allow easier dumping. Narrow buckets
tend to be deep in proportion to width and may fill poorly
in chunky or rocky digging, while wide buckets may
have poor penetration. The digging edge is almost
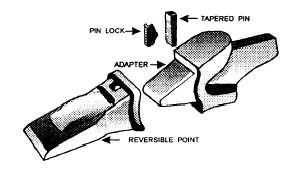
always equipped with teeth that are removable for
reversing, sharping, or replacement (fig. 9-60).
In the NCF, there are other attachments that are used
in excavator operations. These attachments range from
a grader blade, hydraulic power compactor, perforated
dredge bucket, bull prick (jackhammer), ripper, and so
Figure 9-60.-Detachable tooth.
forth. These attachments are maintained by the
attachment custodian in the transportation yard.
When you are using attachments, remember these
rules: (1) always maintain clearance between the
attachment and the cab to prevent equipment damage
and possible injury; (2) when not in use, store
attachments on a hardstand or wood to keep the items
out of sand, mud, and water; and (3) seal hydraulic lines
and fittings for protection from dirt and moisture.
DIGGING PROCEDURES
If you are unfamiliar with the control or basically
have not operated a backhoe in a while, use a slow
engine speed while you familiarize yourself with each
control. At first, operate the controls separately, then
operate two or more controls at the same time. Basic
digging procedures are as follows:
1. Wear the proper personal protective equipment
for the job, including steel toe safety shoes, a hard hat,
and gloves.
2. Check the ground conditions before you start
to dig.
3. Obtain a digging permit and know the location
of any underground cables and pipelines.
4. Check for overhead obstructions, such as
electric lines, tree limbs, and awnings.
5. Remove large rocks, stumps, or other
obstructions before you begin to dig.
6. When you are digging, use a digging stroke that
will fill the bucket. Full buckets are more efficient and
faster than half-full buckets.
7. Try different digging angles with the bucket to
find the best cutting effort for the material you are
removing. The best digging angle cuts the material as
you fill the bucket.
8. When filling the bucket, keep the bottom of the
bucket parallel with the cut, as shown in figure 9-61,
view A.
9. Let the bucket teeth and the cutting edge cut
through the ground like a knife blade, as shown in figure
9-61, view B.
10. Curl the bucket to retain the cut material, as
shown in figure 9-61, view C.
11. The type of material excavated will determine
how much material can be excavated with each cycle.
9-26


