caused personnel injury, damage to equip-
ment, and unnecessary interruption of
propulsion power.
1. Cut the tubing square and lightly deburr
the inside and outside corners. For corrosion
resisting steel (CRES) tubing, use a hacksaw rather
than a tubing cutter to avoid work hardening the
tube end. For CRES, and if necessary for other
materials, dress the tube end smooth and square
with a file. Tube ends with irregular cutting marks
will not produce satisfactory seating surface
impressions.
2. Test the hardness of the ferrule by making
a light scratch on the tubing at least 1/2 inch back
from the tube end, using a sharp corner on the
ferrule. If the ferrule will not scratch the tube,
no bite will be obtained. This test maybe omitted
for flush-type ferrules where the bite will be
visible. Moderate hand pressure is sufficient for
producing the scratch.
3. Lubricate the nut threads, the ferrule
leading and trailing edges, and the preset tool
threads with a thread lubricant compatible with
the system. Slide the nut onto the tubing so the
threads face the tube end. Note whether the
ferrule is a flush type or recessed type (fig. 5-19),
and slide the ferrule onto the tube so the cutting
edge is toward the tube end (large end toward the
nut).
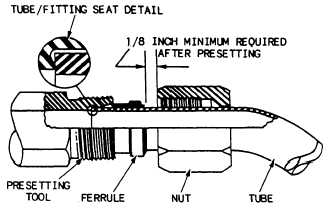
4. Bottom the end of the tubing in the
presetting tool. Slide the ferrule up into the
presetting tool, and confirm that the nut can be
moved down the tube sufficiently to expose at
least 1/8 inch of tubing past the ferrule after the
presetting operation (fig. 5-20) to allow for
inspection of the ferrule.
5. While keeping the tube bottomed in the
presetting tool, tighten the nut onto the fitting
body until the ferrule just grips the tube by
friction. This ring grip point may be identified by
lightly turning the tube or the presetting tool and
slowly tightening the nut until the tube cannot
be turned in the presetting tool by hand.
Mark the nut and the presetting tool at this
position.
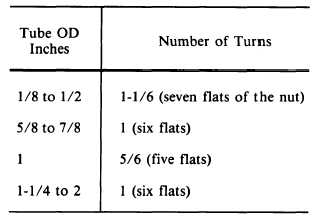
6. Tighten the nut according to the number
of turns given in table 5-3, depending on tube
size.
5-16
Figure 5-20.—Tube and ferrule assembled for preset-
ting, showing nut position required for inspecting
ferrule.
Inspection
Disassemble and inspect the fitting as follows
(mandatory):
1. Ensure that the end of the tubing has an
impression of the presetting tool seat surface
(circular appearing ring) for 360 degrees. A partial
circle, a visibly off-center circle, or a circle broken
by the roughness of the tube end is unsatisfactory.
2. Check for proper bite:
a. For flush-type ferrules, a raised ridge
(fig. 5-21) of tube metal must be visible completely
around the tube at the leading edge of the ferrule.
The best practice is to obtain a ridge about 50
percent of the ferrule edge thickness.
Table 5-3.—Number of Turns


