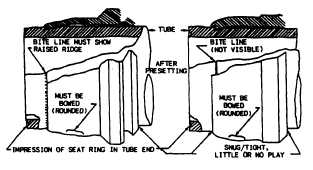
Figure 5-21.—Ferrules installed on tube, preset and removed
for inspection.
b. For recessed-type ferrules, the leading
edge must be snug against the tube OD. Determine
this visually and by attempting to rock the ferrule
on the tube.
3. Ensure that the nut end of the ferrule (both
types) is collapsed around the tube to provide
support against bending loads and vibration.
4. The ferrule (both types) must have little or
no play along the direction of the tube run. Check
this by trying to move the ferrule back and forth
by hand. The ferrule will often be free to rotate
on the tubing; this does not affect its function.
5. For flush-type ferrules, check that the gap
between the raised metal ridge and the cutting end
of the ferrule stays the same while the ferrule is
rotated. (Omit this check for recessed-type ferrules
or if the flush-type ferrule will not rotate on the
tube).
6. Check that the middle portion of the ferrule
(both types) is bowed or sprung into an arc. The
leading edge of the ferrule may appear flattened
into a cone shape; this is acceptable as long as
there is a bowed section near the middle of the
ferrule. If the whole leading section of the ferrule
is flattened into a cone with no bowed section,
the ferrule (and possibly the fitting body, if used)
has been damaged by overtightening and will not
seal reliably.
Final Assembly
When you make a final assembly in the
system, use the following installation procedure:
1. Lubricate all threads with a liquid that is
compatible with the fluid to be used in the system.
2. Place the tube assembly in position and
check for alignment.
3. Tighten the nut by hand until you feel an
increase in resistance to turning. This indicates
that the sleeve or ferrule pilot has contacted the
fitting.
4. If possible, use a torque wrench to tighten
flareless tubing nuts. Torque values for specific
installations are usually listed in the applicable
technical publications. If it is not possible to use
a torque wrench, use the following procedures for
tightening the nuts:
After the nut is handtight, turn the nut 1/6
turn (one flat on a hex nut) with a wrench. Use
a wrench on the connector to prevent it from
turning while tightening the nut. After you install
the tube assembly, have the system pressure tested.
Should a connection leak, you may tighten the
nut an additional 1/6 turn (making a total of 1/3
turn). If, after tightening the nut a total of 1/3
turn, leakage still exists, remove the assembly and
inspect the components of the assembly for scores,
cracks, presence of foreign material, or damage
from overtightening.
NOTE: Overtightening a flareless-tube nut
drives the cutting edge of the sleeve or ferrule
deeply into the tube, causing the tube to be
weakened to the point where normal vibration
could cause the tube to shear. After you complete
the inspection (if you do not find any dis-
crepancies), reassemble the connection and repeat
the pressure test procedures.
CAUTION: Do not in any case tighten the
nut beyond 1/3 turn (two flats on the hex nut);
this is the maximum the fitting may be tightened
without the possibility of permanently damaging
the sleeve or the tube.
CONNECTORS FOR
FLEXIBLE HOSE
As stated previously, the fabrication of flexible
hose assemblies is covered in applicable training
manuals, technical publications, and NAVAIR
01-1A-20. There are various types of end fittings
for both the piping connection side and the hose
5-17