
because the center of one end is not in line with the
center of the other end. The three parts consist of an
upper and a lower section that are truncated rectangular
prisms. The third section is a truncated oblique
pyramid.
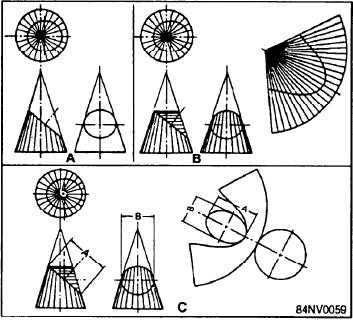
1. Draw the orthographic views, extending the
lines of the sides of the pyramid to its apex in
both views (view A).
2. Rotate the lines of the sides to the horizontal in
the top view. Project the points located on the
front view and draw the true-length lines (view
W
3. At one side of the views, develop the surface of
the oblique square pyramid. Construct one
triangle at a time, and take the length of the three
sides of each triangle from the views (view C).
Draw the upper edges to complete the drawing.
Figure 14-53.--Development of a truncated right cone.
4. Draw the surface patterns of the upper and lower
prisms (view D).
The development of a cone is similar to the
development of a pyramid. Consider it a pyramid with
2. Develop the surface pattern of the cone using
an infinite number of sides. In actual practice, of
the length from the apex to the base as a radius
course, the number of sides are drawn on the
for drawing the arc. Step off on this line the
orthographic views and projected to the development.
equally spaced division of the base. Then,
The steps in developing a truncated right cone are
measure each element individually and transfer
shown in figure 14-53.
this measurement to the development. The ends
The truncated right cone has a center line that is
of each of these elements define the curve of the
perpendicular to its base. The elements on a right cone
upper edge of the peripheral surface (view B).
are all the same length. The true length of these
3. Draw the base surface circle and the top surface
elements is shown by those that fall to the extreme right
ellipse attached to the peripheral surface (view
and left in a front view. These elements are horizontal
lines in a top view. A slanting plane cuts the cone in
C).
figure 14-53. The end points of the elements between
TRIANGULATION
the two outside elements must project to one of the
DEVELOPMENT
outside lines to determine their true lengths.
To develop a truncated right cone, use the following
Triangulation is slower and more difficult than
steps:
parallel line or radial development, but it is more
practical for many types of figures. It is the only
1. Draw the orthographic views. Include either a
method with which the development of warped surfaces
side view (view A) or an auxiliary view of the
may be approximated. In development of triangulation,
ellipse formed by the slanting plane. Note that
the piece is divided into a series of triangles, as in radial
the center of the ellipse must be determined
development. However, there is no one single apex for
since it does not fall on the center line of the
the triangles. The problem becomes one of finding the
cone. This center point is projected to the side
true lengths of the varying oblique lines. This is usually
view and defines the length of the minor axis of
done by drawing a true-length diagram.
the ellipse. The length of the major axis is
defined by the length of the slanting line in the
front view.
14-33