1. Always stop the work before you take a
measurement. DO NOT measure moving parts because
the micrometer may get caught in the rotating work and
be severely damaged.
2. Always open a micrometer by holding the frame
with one hand and turning the knurled sleeve with the
other hand. Never open a micrometer by twirling the
frame, because such practice will put unnecessary strain
on the instrument and cause excessive wear of the
threads.
3. Apply only moderate force to the knurled
thimble when you take a measurement. Always use the
friction slip ratchet if there is one on the instrument. Too
much pressure on the knurled sleeve will not only result
in an inaccurate reading, but also will cause the frame
to spring and force the measuring surface out of line.
4. When a micrometer is not in use, place it where
it will not drop. Dropping a micrometer will cause the
micrometer frame to spring. If you drop a micrometer,
check it for accuracy before you take further readings.
5. Before you store a micrometer, back the spindle
away from the anvil, wipe all exterior surfaces with a
clean, soft cloth, and coat the surfaces with a light oil.
Do not reset the measuring surfaces to close contact
because the protecting film of oil on these surfaces will
be squeezed out.
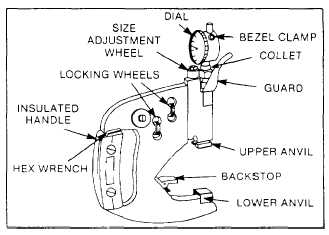
SNAP GAUGE
The snap gauge compares the outside diameters of
parts such as shafts and journals to a standard. It can
compare diameters from zero to 8 inches at an accuracy
of 0.0001 inch. Figure 2-5 shows a typical snap gauge.
Most snap gauges consist of a frame with an
insulated handle, a hex wrench mounted in the handle,
dial indicator digits calibrated in 0.00l-inch divisions, a
bezel clamp, adjustment wheels, locking wheels, a
backstop, a lower anvil, an upper anvil, and a guard.
Whenever you use a snap gauge, use the handle and
avoid touching the gauge proper because body heat may
affect the reading. For the same reason, handle the
standard plugs only by their plastic end. Clean the anvils
and the backstop with a clean cloth. To use the snap
gauge, follow the manufacturer’s operating instructions.
After you record the readings and compare the
readings with the design specifications, clean and store
the snap gauge in its appropriate storage location.
Figure 2-5.—Typical snap gauge.
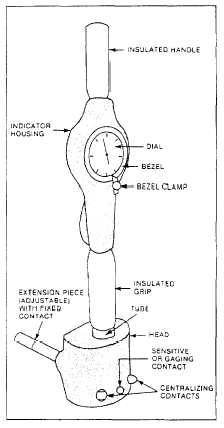
BORE GAUGES
The dial bore gauge is one of the most accurate tools
for measuring a cylindrical bore or for checking a bore
for out-of-roundness or taper. The gauge does not give
a direct measurement. It identifies the amount of
deviation from a preset size or the amount of deviation
from one part of the bore to another. A master ring gauge,
outside micrometer, or vernier caliper can be used to
preset the gauge. Figure 2-6 shows a typical bore gauge.
Figure 2-6.—Typical bore gauge.
2-4