
9.
Beading Line
1.
Stem Apron
10.
Keelson
2.
Main Stem Piece
11.
Filling Block
Stem Knee
3.
12.
Floor Frame
4.
Fore Foot
13.
Frame
5.
Keel
14.
False Keel
6.
Stopwater
15.
Stem Band
7.
Bolts
Rabbet Line
8.
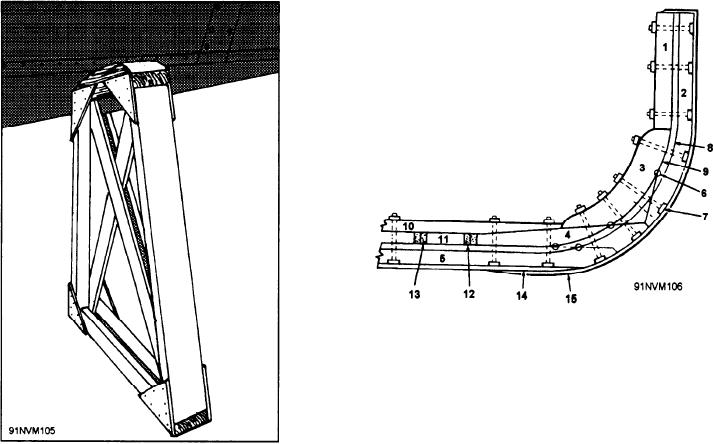
Figure 4-26.--Nomenclature of the bow structure.
Figure 4-25.--Boat chock for shipboard use.
planks have become loosened from the frames and
parts. As an example of the procedure for removing
rabbet. If the planks do not come loose immediately,
damaged parts, a damaged stem can be removed as
remove putty and caulking cotton from the seams and
follows:
tap the planking gently with a rawhide mallet, on the
1. Carefully scrape the paint from the stem and
frame side, to help break the seal.
from the planking as far aft as necessary, exposing the
6. When the seal is broken and the planking comes
countersunk screw holes or the wood plugs over the
free from the frames, run a line around each plank and
fastenings.
fasten it to frame 2. This prevents the planking from
2. Remove the metal stem band, chafing plate, and
springing out and breaking loose farther aft if it
bow chocks. Also, remove the platform decking to clear
becomes necessary to remove the screws completely to
way for work.
pull the stem apron.
3. Remove the brass bolts that secure the stem to
7. Pass a line through the uppermost bolthole in the
the stem apron and knee. Work from the stem apron
stem and apron, and secure the line to a thwart. This
side, and use a drift pin to drive the bolts out. When the
precaution is necessary to keep the stem and apron from
bolts are out, check them for defects; they may require
falling to the deck when the assembly is freed.
rethreading or replacing.
8. Remove the breasthook. Then, the stem
4. Remove the brass screw from the stem where it
assembly will be completely freed.
joins the knee. Figure 4-26 shows the stem and stem
9. Clean the stem and remove all putty, white lead,
apron assembly in relation to the keel, keelson, and
and any foreign matter from the rabbet so that the stem
knee.
will form an accurate pattern piece.
5. Remove plugs or putty from the screw holes, in
the hull planking, and back out the screws to about
REPAIRING THE STEM
one-half their length. In backing out the screws, start aft
and work forward; except where hull planking is
After the damaged stem has been removed and
damaged, all of the damaged material should be
cleaned, use it as a pattern in making the template. Lay
removed. Do not remove any of the screws completely
the damaged stem on a piece of 1/4-inch plywood and
until all of them have been partially backed out and the
block it in a near-level position. Then, trace the outline
4-23