
determine the overall size. The bevels are set on the
with a pencil. Be sure to keep the pencil vertical so that
bandsaw; the cuts are then made; the piece is then
the boundaries of the template will be the same as the
trimmed to the lines on the jointer.
boundaries of the stem. Check the boundaries by using
dividers as a test gauge. Then cut the plywood on the
The new stem and the new stem apron must be
penciled lines, and smooth the template with a plane.
very accurately fitted. It is essential to drill the lowest
To lay out the rabbet, set the dividers at the distance
bolthole on the stem so that it will match up
from the back of the damaged stem to the outside of the
EXACTLY with the bolthole in the knee. The best way
rabbet; then put the dividers on the template in the same
to make certain that the lowest bolthole on the stem is
relative location, and mark the template. Repeat this
aligned with the bolthole in the knee is to clamp the
procedure along the entire length of the stem, at ap-
stem to the knee (using C-clamps and blocks), and
proximately l-inch intervals, so that the rabbet line will
then drill through the bolthole in the knee. Be careful
be marked all the way along the template.
that you do not enlarge the bolthole in the knee while
Next, place the template on the lumber, as shown in
you are drilling through the stem.
figure 4-27, making sure that the maximum strength is
obtained by avoiding as much cross grain as possible.
After this first bolthole has been drilled in the stem,
Mark off the stem on both sides of the lumber, according
insert a bolt of the proper size and type and draw it taut.
to the template; allow 6 to 8 inches excess length above
Then remove the C-clamps and the blocking. Place
the capping.
cabinetmakers' clamps over the stem and the knee, at
Remove the template, and cut the new stem. Use a
each end. Then drill the second bolthole, insert the bolt,
bandsaw to cut within 1/32 inch of the lines; then finish
and draw it taut. The completion of the job from this
by planing to the lines. Lay the template on the piece
point is just a matter of fairing in, fitting, white leading,
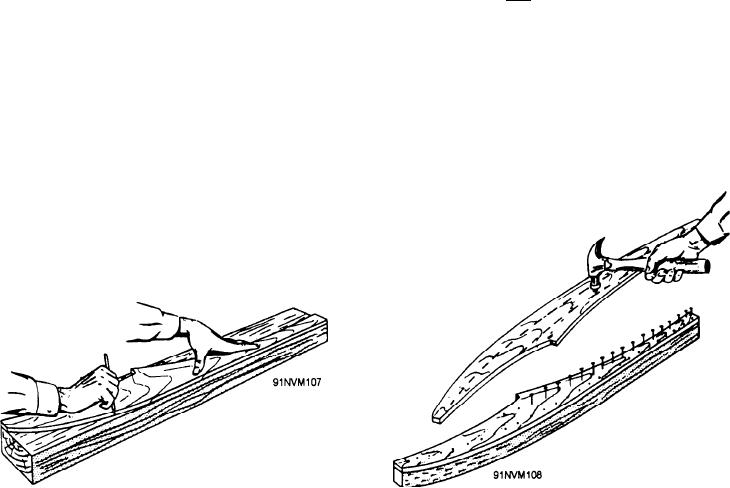
again, and drive small nails through the template along
shaping the stem to correspond to the width of the
the rabbet lines. Drive the nails entirely through the
forefoot, tapering off to the full width at the top, and
template and into the piece so that the rabbet lines will
drilling holes for stopwater. Do not try to drill the holes
be marked on the piece by the small nail holes. Then,
for stopwaters until after the stem has been set in place.
remove the template and drive small nails into the holes
Any damaged planking should be replaced at least
in the new piece. Draw pencil lines from nail to nail,
six frames aft of the stem to ensure a substantial
and you will have the rabbet lines marked on the new
planking jott. If more than one plank must be replaced,
stem. Figure 4-28 shows the procedure for transferring
be sure to stagger the after end joints of adjacent
rabbet lines.
planks so that they are at least two frames apart. Figure
Chisel a series of notches on the rabbet lines. Be
4-29 illustrates a completed stem repair job. Notice
careful that you do not remove too much wood;
that the boltholes are ready for plugging, and the two
additional paring may be done when the planks are
new planks are ready for caulking.
being fitted to the stem. In cutting the rabbet, use a
piece of planking as a template. Make the steam apron
by copying the damaged piece. You do not have to
make a template, since you can use a bevel square to
get the bending lines and a rule and compass to
Figure 4-28.--Transfer of rabbet lines.
Figure 4-27.--Using the template.
4-24