Chip Test
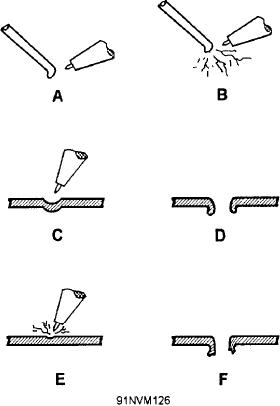
The actual test consists of melting a puddle in the
steel. If the metal is thin, the puddle penetrates through
Another test that must be accompanied by
the thickness of the steel until a hole is formed. This
considerable experience is the chip test. To make a
puddling should be done with a neutral flame, held at
chip test, use a sharp cold chisel to remove a small
the proper distance from the metal. The puddle should
amount of metal from a sample. The ease with which
not spark excessively or boil. The puddle should be
the chipping can be done gives some indication of the
fluid and should possess good surface tension. The
kind of metal with which you are working. The size,
appearance on the edge of the puddle or hole indicates
form, and color of the chips and the appearance of the
the weldability of the steel. If the metal that was
edges (whether smooth or sawtoothed) give further
melted has an even, shiny appearance upon
clues.
solidification, the metal is generally considered as
having good welding properties. However, if the
In this test, the cutting action of the chisel
molten metal surface is dull or has a colored surface,
indicates the structure and heat treatment of the metal.
the steel is unsatisfactory for welding. The steel is also
Cast iron, for example, when being chip-tested, breaks
considered unsatisfactory for welding if the surface is
off in small particles, whereas a mild steel chip tends
rough, perhaps even broken up into small pits or
to curl and cling to the original piece. Higher-carbon,
porous spots.
heat-treated steels cannot be tested this way because
of hardness. A rough test between mild carbon steel
This test is accurate enough for most welding. The
and chrome-moly steel may be indicated by the
test is very easily applied with the equipment on the
relative hardness of the metals while being
job. The test determines the one thing that is
hacksawed.
fundamentally necessary in any welding job, that is,
the weldability of the metal. Figure 6-12 shows how
You will not be able to identify metals by the chip
this test is conducted. While performing the
test method until you have had considerable
weldability test of the metal, it is important to note the
experience. You should practice with samples of
amount of sparking emitted from the molten metal. A
known metals until you have learned how to identify
metal that emits few sparks has good welding
c a r b o n steel, carbon-molybdenum steel,
qualities.
chromium-molybdenum steel, chromium-nickel steel,
and other metals. The information given in table 6-5
will help you to recognize some of the more common
metals.
Fracture Test
The fracture test is used extensively and consists
of breaking a portion of the metal in two. If it is a repair
job, the fractured surface may be inspected. The
appearance of the surface where the metal is cracked
shows the grain structure of the metal. If the grains are
large, the metal is ductile and weak. If the grains are
small, the metal is usually strong and has better
ductility. Small grains are usually preferred. The
fracture shows the color of the metal, which is a good
means of identifying one metal from another. The test
also indicates the type of metal by the ease with which
it may be fractured.
Color Test
The color test separates two main divisions of
metals. The irons and steels are indicated by their
Figure 6-12.--Torch flame test: (A) Good quality filler rod. (B)
typical gray white color. Nonferrous metals come in
Poor quality filler rod. (C) and (D) Good quality base
two general color classifications of yellow and white.
metal. (E) and (F) Poor quality base metal.
6-18

