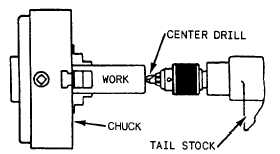
Figure 9-21.—Drilling a center hole.
9-20 show the correct overhang for the tool bit and the
holder.
The point of the tool must be correctly positioned
on the work Place the cutting edge. slightly above the
center for straight turning of steel and cast iron and
exactly on the center for all other work To set the tool
at the height desired, raise or lower the point of the tool
by moving the wedge in or out of the tool post ring. By
placing the point opposite the tailstock center point, you
can adjust the setting accurately.
HOLDING THE WORK
You cannot perform accurate work if the workpiece
is improperly mounted. The requirements for proper
mounting are as follows:
1.
2.
3.
4.
The work center line must be accurately
centered along the axis of the lathe spindle.
The work must be held rigidly while being
turned.
The work must NOT be sprung out of shape by
the holding device.
The work must be adequately supported against
any sagging caused by its own weight and
against springing caused by the action of the
cutting tool.
There are four general methods of holding work in
the lathe: (1) between centers, (2) on a mandrel, (3) in a
chuck, and (4) on a faceplate. Work may also be clamped
to the carriage for boring and milling, in which case the
boring bar or milling cutter is held and driven by the
headstock spindle.
Other methods of holding work to suit special
conditions are (1) one end on the live center or in a chuck
and the other end supported in a center rest, and (2) one
end in a chuck and the other end on the dead center.
Holding Work Between Centers
To machine a workpiece between centers, drill
center holes in each end to receive the lathe centers.
Secure a lathe dog to the workpiece. Then mount
the work between the live and dead centers of the
lathe.
CENTERING THE WORK.—To center round
stock where the ends are to be turned and must be
concentric with the unturned body, mount the work on
the head spindle in a universal chuck or a draw-in collet
chuck If the work is long and too large to pass through
the spindle, use a center rest to support one end. Mount
a center drill in a drill chuck in the tailstock spindle and
feed it to the work by turning the tailstock handwheel
(fig. 9-21).
For center drilling a workpiece, the combined
drill and countersink is the most practical tool.
These combined drills and countersinks vary in
size and the drill points also vary. Sometimes a drill
point on one end will be 1/8 inch in diameter, and
the drill point on the opposite end will be 3/16 inch
in diameter. The angle of the center drill must
always be 60° so that the countersunk hole will fit
the angle of the lathe center point.
If a center drill is not available, center the work
with a small twist drill. Let the drill enter the work
a sufficient distance on each end; then follow with
a 60° countersink.
In center drilling, use a drop or two of oil on the
drill. Feed the drill slowly and carefully to prevent
breaking the tip. Take extreme care when the work is
heavy, because you will be less able to “feel” the
proper feed of the work on the center drill.
If the center drill breaks during countersinking and
part of the broken drill remains in the work, you must
remove this part. Sometimes you can drive the broken
piece out by a chisel or by jarring it loose, but it may
stick so hard that you cannot remove it this way. Then
you must anneal the broken part of the drill and drill it
out.
We cannot overemphasize the importance of
proper center holes in the work and a correct angle
on the point of the lathe centers. To do an accurate
job between centers on the lathe, you must ensure
that the center-drilled holes are the proper size and
depth and that the points of the lathe centers are
true and accurate.
9-13


