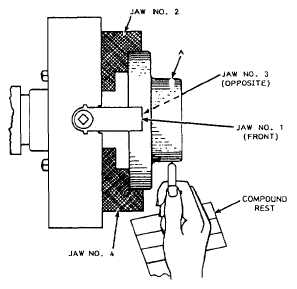
Figure 9-23.—Work mounted in a four-jaw chuck.
rings, put each jaw the same distance from the
outside edge of the body of the chuck.
2. Fasten the work in the chuck by turning the
adjusting screw on jaw 1 and then on jaw 3, a
pair of jaws which are opposite each other. Next,
tighten jaws 2 and 4.
3. At this stage the work should be held in the
jaws just tightly enough so it will not fall out
of the chuck while you turn it.
4. Revolve the spindle slowly by hand and, with
a piece of chalk, mark the high spot (A in fig.
9-23) on the work while it is revolving. Steady
your hand on the tool post while holding the
chalk.
5. Stop the spindle. Locate the high spot on the
work and move the high spot toward the center
of the chuck by releasing the jaw opposite the
chalk mark and tightening the one nearest the
mark
6. Sometimes the high spot on the work will be
located between adjacent jaws. In that case,
loosen the two opposite jaws and tighten the
jaws adjacent to the high spot.
THREE-JAW UNIVERSAL CHUCK.—The
three-jaw universal or scroll chuck is made so that
all jaws move at the same time. A universal chuck
will center almost exactly at the first clamping, but
after a long period of use may develop inaccuracies
of up to 0.010 inch in centering the work. You can
usually correct the inaccuracy by inserting a piece
of paper or thin shim stock between the jaw and the
work on the high side.
When you chuck thin sections, be careful not to
clamp the work too tightly because the work will distort.
If you machine distorted work, the finished work will
have as many high spots as there are jaws, and the turned
surface will not be true.
Care of Chucks
To preserve the accuracy of a chuck, handle it
carefully and keep it clean and free from grit. NEVER
force a chuck jaw by using a pipe as an extension on the
chuck wrench.
Before mounting a chuck, remove the live center
and fill the hole with a rag to prevent chips and dirt from
getting into the tapered hole of the spindle.
Clean and oil the threads of the chuck and the
spindle nose. Dirt or chips on the threads will not
allow the chuck to run true when it is screwed up
to the shoulder. Screw the chuck on carefully,
tightening it just enough to make it difficult to
remove. Never use mechanical power to install a
chuck.
To remove a chuck, place a spanner wrench on the
collar of the chuck and strike a smart blow on the handle
of the wrench with your hand. When you mount or
remove a heavy chuck, lay a board across the bed ways
to protect them; the board will support the chuck as you
put it on or take it off.
The comments on mounting and removing chucks
also apply to faceplates.
Holding Work on a Faceplate
A faceplate is used for mounting work that cannot
be chucked or turned between centers because of its size
or shape.
Work is secured to the faceplate by bolts, clamps, or
any suitable clamping means. The holes and slots in the
faceplate are used for anchoring the holding bolts. Angle
plates may be used to position the work at the desired
9-15


