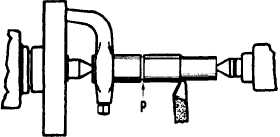
Figure 9-29.—Machining to a shoulder.
occurs during machining to change the position of the
tool, it will not dig into the work, but rather will move
in the direction of the arrow-away from the work
Finish Turning
When you have rough turned the work to within
about 1/32 inch of the finished size, take a finishing cut.
A fine feed, the proper lubricant, and, above all, a
keen-edged tool are necessary to produce a smooth
finish. Measure carefully to be sure you are machining
the work to the proper dimension. Stop the lathe when
you take measurements.
If you must finish the work to close tolerances, be
sure the work is not hot when you take the finish cut. If
you turn the workpiece to exact size when it is hot, it
will be undersize when it has cooled.
Perhaps the most difficult operation for a beginner
in machine work is to make accurate measurements. So
much depends on the accuracy of the work that you
should make every effort to become proficient in the use
of measuring instruments. You will develop a certain
“feel” in the application of micrometers through
experience alone; do not be discouraged if your first
efforts do not produce perfect results. Practice taking
micrometer measurements on pieces of known
dimensions. You will acquire skill if you are persistent.
Turning to a Shoulder
Machining to a shoulder is often done by locating
the shoulder with a parting tool. Insert the parting tool
about 1/32 inch from the shoulder line toward the small
diameter end of the work Cut to a depth 1/32 inch larger
than the small diameter of the work. Then machine the
stock by taking heavy chips up to the shoulder. This
procedure eliminates detailed measuring and speeds up
production.
Figure 9-29 illustrates this method of shouldering.
A parting tool has been used at P and the turning tool is
taking a chip. It will be unnecessary to waste any time
in taking measurements. You can devote your time to
rough machining until the necessary stock is removed.
Then you can take a finishing cut to accurate
measurement.
Boring
Boring is the machining of holes or any interior
cylindrical surface. The piece to be bored must have a
drilled or cored hole, and the hole must be large enough
to insert the tool. The boring process merely enlarges the
hole to the desired size or shape. The advantage of
boring is that a true round hole is obtained, and two or
more holes of the same or different diameters may be
bored at one setting, thus ensuring absolute alignment
of the axis of the holes.
Work to be bored may be held in a chuck, bolted to
the faceplate, or bolted to the carriage. Long pieces must
be supported at the free end in a center rest.
When the boring tool is fed into the hole of work
being rotated on a chuck or faceplate, the process is
called single point boring. It is the same as turning
except that the cutting chip is taken from the inside. The
cutting edge of the boring tool resembles that of a
turning tool. Boring tools may be the solid forged type
or the inserted cutter bit type.
When the work to be bored is clamped to the top of
the carriage, a boring bar is held between centers and
driven by a dog. The work is fed to the tool by the
automatic longitudinal feed of the carriage. Three types
of boring bars are shown in figure 9-30. Note the center
holes at the ends to fit the lathe centers.
Figure 9-30, view A, shows a boring bar fitted with
a fly cutter held by a headless setscrew. The other
setscrew, bearing on the end of the cutter, is for adjusting
the cutter to the work
Figure 9-30, view B, shows a boring bar fitted with
a two-edged cutter held by a taper key. This is more of
a finishing or sizing cutter, as it cuts on both sides and
is used for production work.
The boring bar shown in figure 9-30, view C, is
fitted with a cast-iron head to adapt it for boring work
9-18


