
2. Remove the sheet. Insert the sheet, flanged
edge down, all the way into the brake. Raise the lower
leaf to make the maximum possible bend.
3. Remove the sheet from the brake. Turn the
sheet so that the side with the 90-degree angle is up, and
slide it into the brake until this angle is flush with the
forward edge of the upper jaw. Raise the lower leaf
through the maximum arc.
4. Raise the upper jaw and slide the sheet farther
into the brake until the edge of the sheet once again is
flush with the front edge of the upper jaw.
5. In the recess that will form the pocket of the
seam, insert a strip of metal of the same gauge as the
metal you are forming. One long strip running the length
of the seam may be used, or several smaller lengths of
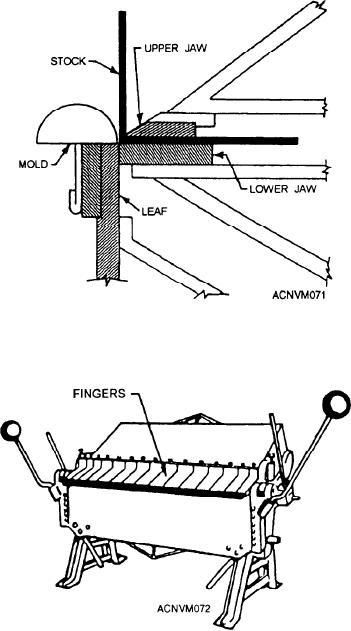
Figure 12-71.--Work ready to be formed over mold on
stripping may be used. The stripping material should be
standard cornice brake.
about 1 inch wide.
6. Close the left-hand clamping device.
7. Use an easy up-and-down motion with the
right-hand clamping device to start pressing the folds of
the seam together. Complete the flattening operation in
the manner described for flattening hems.
8. Turn the sheet over and line up the inner bent
edge with the front edge of the upper jaw. Lower the
upper jaw with the clamping handles.
9. The clamping procedure used in the preceding
step will cause the formed edge of the seam to rise
slightly. To bring this section back in line, work it down
with a wooden mallet.
10. Bend the other portion that fits into the pocket
Figure 12-72.--Box and pan brake (finger brake).
to a 90-degree angle. Be sure the flange is the correct
width.
11. Remove the strips from the pocket.
this will be the right-hand end. After prolonged use on
one end, that end is worn more than the other, thus
12. Insert the flanged edge into the pocket. Tap it
requiring an adjustment.
firmly in place with a mallet. Bend the protruding edge
over with a mallet, and the seam is finished.
The box and pan brake, normally called a finger
brake, shown in figure 12-72, can do everything that the
Some brakes are equipped with molds, others are
cornice brake can do and several things that the cornice
not. You will probably not have much occasion to use
brake cannot do.
molds. However, they are useful for forming special
The upper jaw of the finger brake consists of a series
shapes. The molds are fastened to the brake by means
of steel fingers of varying widths, whereas the cornice
of friction clamps, in such a position that the work can
brake has one long bar. The fingers are secured to the
be formed over them. Figure 12-71 shows sheet that is
upper jaw by thumbscrews, as shown in figure 12-73.
ready to be formed over a mold that is attached to a
brake.
The finger brake is particularly useful in forming
boxes, pans, and other similar shapes. If these shapes
Occasionally one end of a sheet is bent at a sharper
were formed on a cornice brake, you would have to
angle than the other end. The end that made the lower
straighten part of the bend on one side of the box to
quality bend will then need to be adjusted. Normally
12-32