
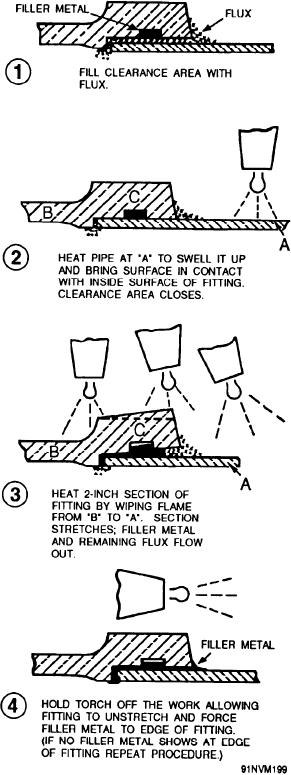
the flame over the surface with a circular, sweeping
surface not yet up to temperature. Play the torch over a
motion so that you obtain uniform heating of the parts
2- or 3-inch section of the fitting. That will cause the
to be joined. The flame should be soft so that it will not
fitting to stretch or open up and let whatever remaining
blow or boil the molten filler metal.
flux is present run out. Hold the torch off the work and
Bring up the temperature of the parts until the flux
the fitting will return to normal size and force the filler
on them is melted. Continue heating the parts to be
metal to the edge of the fitting. You may be sure that a
joined until they are hot enough to melt the tiller rod.
good joint is formed when you can see the filler metal
The filler should be melted by the heat of the joint, not
at one or both edges of the joined area. Figure 9-9 shows
by the flame. It should flow like water wherever the flux
the step-by-step process of brazing by the insert method.
has been applied. Avoid overheating. Use just enough
heat to get the parts of the joint hot enough to melt the
filler metal so that it can flow.
Two methods are used to make joints with silver-
base brazing filler metal: the insert method and the
feed-in method (more commonly referred to as face
feeding). With either method, the parts must be
adequately supported during heating to maintain
alignment and tolerances or fit. The work must be held
firmly in positionuntil the silver brazing tiller metal has
completely solidified.
When you use the insert method, insert a strip of the
silver-base filler metal in the joint before assembly.
Before brazing the parts, clean them with emery cloth,
sandpaper, or some other abrasive, and apply flux with
a brush. Next, fit the two parts together and align them.
Then, light-off the torch and direct the heat on the tube
or thinner portion, as shown in figure 9-8. The lines
drawn on the tube indicate the path of the torch while
the tube is being heated.
Heat applied to the tubing causes it to swell. This
brings the surface of the tube into contact with the inside
surface of the fitting. The clearance area is closed,
forcing the flux from either end of the joint. Be sure to
heat the entire circumference of the tube until the flux
begins to flow. Flux flow tells you that the tube has
expanded sufficiently, and signals you to proceed to the
second phase of heating. The flux flows freely shortly
after fluidity becomes apparent. At that time, direct the
flame to that portion of the fitting hub farthest from the
junction of the tube and the fitting. Sweep the flame
over the joint segment in a circular motion until the
brazing filler metal appears at the junction of the pipe
and fitting. At that moment, flick the torch away so that
the flame wipes toward the pipe. This completes one
segment of the joint. Repeat the procedure until all
segments are completed. A satisfactory joint shows a
continuous ring of filler metal at the end of the fitting.
The ring must be smooth and concave.
In the insert method, the filler metal will not leave
the recess unless both parts are at the proper bonding
temperature. One of the parts may be up to temperature
while the other is not. At that point, the filler metal will
not flow because it will be cooled or quenched by the
Figure 9-9.--Insert method of silver brazing.
9-9