3. The point where the two lines cross gives the
made to a print. All revisions are noted in this block
exact location of the particular point and a general
and are dated and identified by a letter and a brief
location of the item.
description of the revision. Other information
contained in the revision block is the name of the person
who made the change and when the change was made.
Bill of Material
The revision block should always be reviewed prior to
beginning a job to ensure you are familiar with the latest
The bill of material is a list of parts or materials
change. The most recent revision is noted in the title
required by or used on the print. It is probably the most
block
used section on a blueprint. Not only does the bill of
Application Block
material list all the material used, but it also gives a
description of that item, the quantity of material used or
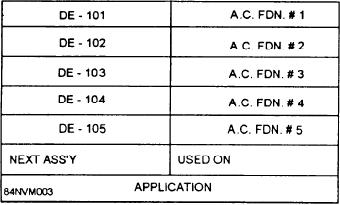
The application block, located near the title block,
required, material weight or thickness, MILSPECs or
identifies directly or by reference the larger units of
commercial standards to which that item must conform
which the detailed part of the assembly on the drawing
to, and other applicable information. Figure 13-4
forms a component. On most prints used by HTs, the
shows an example of a bill of material.
application block will list the class of ship and those
ships in that class that are equipped with that item. But
Each item in the drawing on a blueprint is identified
you will also use prints that are generic to a class of ship
with a number designation or a combination of letter
(applicable to all ships of that class). These prints
and numbers. An example of an item number for a piece
usually pertain to hull structures and other associated
of pipe between two fittings would be P-3 and the
structures. A sample of an application block is shown
fittings F-1 and F-2. In this example, the letter P means
in figure 13-3.
pipe, and the number 3 identifies that particular pipe.
The letter F means fitting and the numbers 1 and 2
Zone Numbers
identify the particular fittings. Next, locate the item
number P-3 on the bill of material. You would find out
Zone numbers on blueprints and machine drawings
that particular piece of pipe is 2-inch, schedule 40,
serve the same purpose as the numbers and letters
carbon steel pipe, conforming to an applicable
printed on borders of maps to help you locate a
MILSPEC.
particular point. Zone numbers on blueprints are
located on the top, bottom, and side margins of the print.
It is always important that you properly locate an
The draftsman uses a combination of numbers and
item on a blueprint and read the bill of material to ensure
letters along the margins to identify the zone numbers.
that you know what materials you will be working with.
To locate a particular point, use the following steps:
You should never substitute material listed on a
blueprint without first obtaining approval from
1. Locate the given zone numbers for a given item
competent authority. Also, by reading the bill of
on the top, bottom, and side margins of the blueprint.
material, you will be able to determine the proper
2. Follow an imaginary line from each zone
welding or brazing process to join the base metals.
number toward the opposite side.
LINES AND SYMBOLS
To properly read blueprints, you must be familiar
with the lines and symbols used on a blueprint. These
lines and symbols convey important information to the
HT. Lines and symbols will also keep the reader from
misinterpreting information shown on the blueprint.
Various types of lines are used to show different objects
and their positions. Commonly used lines and symbols
are shown in figure 13-5 and are listed as follows:
-- Visible lines are heavy unbroken lines.
--Hidden lines are medium lines with short,
Figure 13-3.--Application block.
evenly spaced dashes.
13-4

