Now lay out the rivet holes for the seam and for
SHEET METAL PRACTICE PROJECTS
fastening the shelf to the body of the locker. Then lay
As soon as you have learned the basic operations of
out the locker's back and shelf. Mark the locations of
laying out, cutting, forming, and joining sheet metal,
the rivet holes to match those on the main body of the
you will be ready to try your hand at fabricating various
locker. Be sure to provide for a stiffening flange on the
objects. You should have no trouble in laying out and
front of the shelf when you lay out the shelf.
fabricating boxes, pans, cylinders, funnels, ells, tees,
The next step is to lay out the door. Remember, all
elbows, and many other sheet metal items, if you follow
the layout lines will be on the inside of the sheet when
the procedures that were given in this chapter. It takes
it is folded up, so the actual door will be slightly larger
a lot of practice to develop a skill for sheet metal work.
than the layout. Make allowances for this so that the
All your practicing should be done on scrap metal until
door will fit into the jamb. Also, the door must not make
you are good enough to turn out finished articles
a tight fit. It must have clearance so that it can open and
without wasting material.
close freely. Generally, twice the thickness of the metal
Building a locker is a good practice project because
is allowed for this clearance.
it involves so many aspects of sheet metal layout and
After all the pieces have been laid out, trimmed,
fabrication. The locker described here is fairly simple.
notched, and the rivet holes made, the next step is to
You will have to develop your own plans for a more
form the locker to its shape. It does not matter which
elaborate or an odd-shaped locker.
part of the locker you form first. The back has four
The first thing to consider in building a locker is the
90-degree bends that will form the flanges of the
outside dimensions. Then decide on the thickness of
Pittsburgh lock seam. Form the hem first on the shelf,
metal you will use, the method of seaming, the number
then the stiffening flange. The tabs for riveting the shelf
and location of shelves, and the type of door it will have.
to the main body of the locker may be bent either up or
Plan out all of these details before you start your layout.
down.
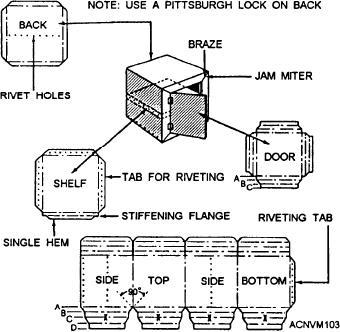
Figure 12-103 shows a locker that has one riveted
Form the pocket for the Pittsburgh lock seam on the
shelf. The locker is assembled by using Pittsburgh lock
main body of the locker. Then form the jamb on the
seams and rivets. The door is flush to the front side and
opposite edge of the sheet. Follow these procedures for
is swung on exposed hinges. A hasp and staple are used
bending the jamb:
as a securing device.
Lay out the main body of the locker. Provide
1. Transfer the lines of the jamb (indicated by X in
sufficient allowances for all of the scams and the
fig. 12-103) to the reverse side of the sheet.
doorjamb. One Pittsburgh lock seam is used for the
main body of the locker, and another one is used for the
back. The layout for the doorjamb is determined by the
following factors:
1. The size of the door in its relation to the size of
the locker. (The difference between the size of the door
and the size of the locker controls dimension A in fig.
12-103.)
2. The thickness of the door. (This controls
dimension B in fig. 12-103.)
3. The width of the stop (C in fig. 12-103).
Normally the stop is about 3/8 inch to l/2 inch in width.
4. The allowance for the single hem (D in fig.
12-103). This allowance will be slightly less than that
of the stop.
The next step is to lay out the notches. Square
notches are used for the Pittsburgh lock scam. A
combination of notches is required for the doorjamb. A
is laid out at 45, B at 90, C at 45, and D at 90 to the
Figure 12-103.--Fabricating a locker.
base line.
12-43

