In carburized steel, spalling is caused by an
undesired carbide network which formes of grain
boundaries. To prevent in carburized steel, quench the
parts immediately upon removing them from the
carburized medium if the grains have not increased in
size. If there has been an increase in grain size, reheat
the metal to its critical temperature of the core and the
case. Improper use of grinding wheels and insufficient
use of coolant to keep the surface of the metal cool at
all times will also cause spalling.
BLISTERING
Special care must be taken in heat-treating wrought
aluminum alloy to prevent blistering. Blistering is
caused by overheating and, in some cases, oversoaking.
Overheated hardenable aluminum alloys are rendered
useless because the eutectic constituent has melted.
HARDNESS TEST
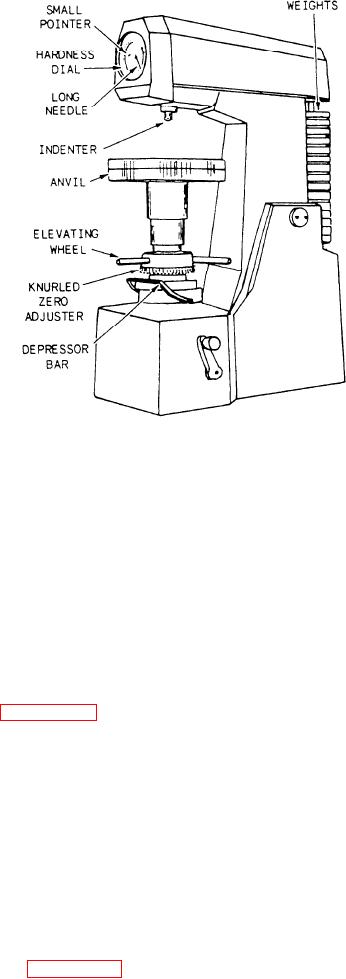
Figure 15-23.--Standard Rockwell hardness testing machine.
A number of tests are used to measure the physical
properties of metals and to determine whether a metal
meets specification requirements. Some of the more
ROCKWELL HARDNESS TEST
common tests are hardness tests, tensile strength tests,
shear strength tests, bend tests, fatigue tests, and com-
Of all the hardness tests, the Rockwell is the one
pression tests. Of primary importance to a Machinery
most frequently used. The basic principle of the
Repairman after heat-treating metal is the hardness test.
Rockwell test (like that of the Brinell, Vickers,
Eberbach, Tukron, and Monotron tests) is that a hard
Most metals possess some degree of hardness--that
material will penetrate a softer one. This test operates
is, the ability to resist penetration by another material.
on the principle of measuring the indentation, in a test
Many tests for hardness are used; the simplest is the file
piece of metal, made by a ball or cone of a specified size
hardness test, which will be discussed later in this
that is being forced against the test piece of metal with
chapter. While fair estimates of hardness can be made
specified pressure. In the Rockwell tester, shown in
by an experienced worker, more consistent quantitative
measurements are obtained with standard hardness
measuring the depression made by a hardened steel ball
testing equipment.
(indenter) or a spheroconical diamond penetrator of a
given size under a given pressure.
Hardness may be measured by many types of
instruments. The most common are the Rockwell and
With the normal Rockwell tester shown, the 120
Brinell hardness testers. Other hardness tests include the
spheroconical penetrator is used in conjunction with a
Vickers, Eberbach, Monotron, Tukon, and Scleroscope.
150-kilogram (kg) weight to make impressions in hard
metals. The hardness number obtained is designated
Since there are many tests and the hardness numbers
Rockwell C (Rc). For softer metals, the penetrator is a
derived are not equivalent, the hardness numbers must
1/16-inch steel ball used in conjunction with a 100-kg
be designated according to the test and the scale used in
weight. A hardness number obtained under these
the test. Comparison charts for the various hardness
conditions is designated Rockwell B (Rb).
numbers can be found in the current edition of the
Machinery's Handbook. Since you are more likely to
have access to a Rockwell tester than any other, we will
hardness tests. Although the conical penetrator is
shown, the principle is the same for a ball penetrator.
discuss this method.
15-28


