Several types of tools are required for shaper or
should use to grind a round-nose turning tool. We'll
planer operations. Although the types differ
describe each of the steps in the following paragraphs:
considerably in shape, the same general rules govern
1. Grind the left side of the tool, holding it at the
the grinding of each type.
correct angle against the wheel to form the
To be sure you have an efficient cutting tool, grind
necessary side clearance. Use the coarse
the side relief and end relief of the tool to give a
grinding wheel to remove most of the metal,
projecting cutting edge. If the clearance is insufficient,
then finish on the fine grinding wheel. (If you
the tool bit will rub the work, causing excessive heat and
grind the cutting edge on the periphery of a
producing a rough surface on the work. If the tool is
wheel less than 6 inches in diameter, it will be
given too much relief, the cutting edge will be weak and
undercut and will not have the correct angle.)
will tend to break during the cut. The fRont and side
Keep the tool cool while you grind it.
clearance angles should seldom exceed 3 to 5.
In addition to relief angles, the tool bit must slope
2. Grind the right side of the tool, holding it at
away from the cutting edge. This slope is known as
the required angle to form the right side.
side rake and reduces the power required to force the
3. Grind the radius on the end of the tool. A
cutting edge into the work. The side rake angle is
small radius (approximately 1/32 inch) is
usually 10 or more, depending upon the type of tool
preferable because a large radius may cause
and the metal being machined. Roughing tools
chatter. Hold the tool lightly against the wheel
should have no back rake although a small amount is
and turn it from side to side to produce the
generally required for finishing.
desired radius.
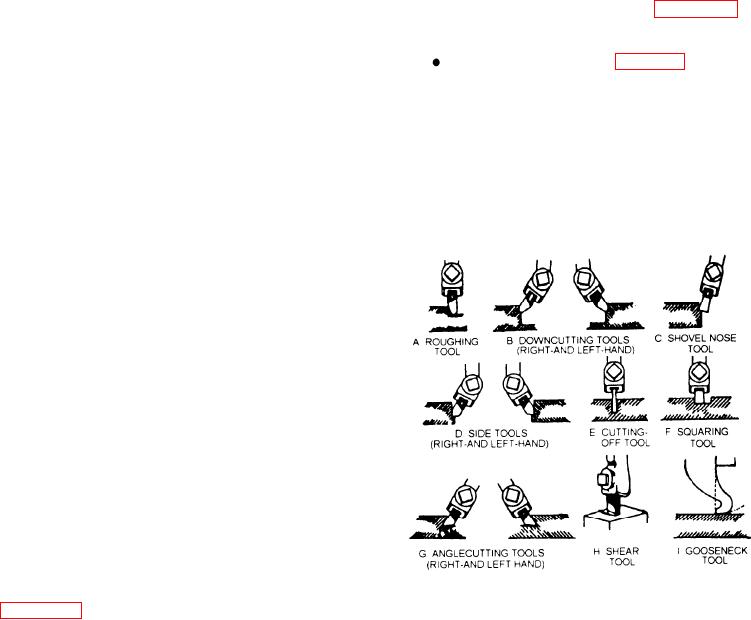
The shape and use of various standard shaper and
planer cutting tools are illustrated in figure 5-24 and
4. Grind the front of the tool to the desired front
described in the following paragraphs:
clearance angle.
5. Grind the top of the tool, holding it at the
very efficient for general use and is designed to take
required angle to obtain the necessary side
heavy cuts in cast iron or steel. You will generally
rake and back rake. Try not to remove too
grind it for left-hand operation as illustrated. For
much of the metal. The more metal you leave
special applications, you can reverse the angles for
on the tool, the better the tool will absorb the
right-hand cuts. Do not give this tool any back rake
heat produced during cutting.
although the side rake may be as much as 20 for soft
6. Hone the cutting edge all around and on top
metals. Do finishing operations on small flat pieces
with an oilstone until you have a keen cutting
with the roughing tool if a fine feed is used.
edge. Use a few drops of oil on the oilstone.
Honing will improve the cutting quality of the
tool, produce a better finish on the work, and
cause the cutting edge to stand up much longer
than one that is not honed. The cutting edge
should be sharp in order to shear off the metal
rather than tear it off.
SHAPER AND PLANER TOOLS
Shaper and planer cutting tools arc similar in
shape to lathe tools but differ mainly in their relief
angles. These tools are held practically square with
the work and do not feed during the cut; therefore,
relief angles are much less than those in turning
operations. The nomenclature of shaper and planer
tools is the same as that for lathe tools; and the
elements of the tool, such as relief and rake angles,
are in the same relative positions as those shown in
Figure 5-24.--Standard shaper and planer tools.
5-18


