position, the dial will be upside down, making it
necessary to use a mirror and flashlight to obtain a
reading.
NOTE: Once you have placed the indicator in
position for the first deflection reading, do not touch the
gauge until you have taken and recorded all four
readings.
Deflection readings are also used to determine
correct alignment between the engine and the generator
or between the engine and the coupling. However, when
determining alignment, you should take a set of
deflection readings at the crank nearest the generator or
the coupling. In aligning an engine and generator, you
may need to install new chocks between the generator
and its base to bring the deflection within the allowable
value. You may also need to shift the generator
horizontally to obtain proper alignment. To align an
engine and a coupling, first, correctly align the coupling
with the drive shaft; then, properly align the engine to
the coupling, rather than aligning the coupling to the
engine.
BEARING TROUBLES
Bearings become a continual source of trouble
unless personnel entrusted with operating the engine
follow the recommended operation and maintenance
procedures exactly.
Severe bearing failures are indicated during engine
operation by a pounding noise or by the presence of
smoke in the vicinity of the crankcase. Impending
failures may sometimes be identified by a rise in the
lubricating oil temperature or a lowering of the
lubricating oil pressure. Impending bearing failure may
be detected during periodic maintenance checks or
during engine overhauls by inspection of the bearing
shells and backs for pits, grooves, scratches, or evidence
of corrosion.
The indication of an impending failure does not
necessarily mean that the bearing has completed its
useful life. Journal bearings may perform satisfactorily
with as much as 10 percent of the load-carrying area
removed by fatigue failure. Other minor casualties may
be repaired so that a bearing will give additional hours
of satisfactory service.
Bearings should not be rejected or discarded for
minor pits or minute scratches; however, areas
indicating metallic contact between the bearing surface
and the journal do mean replacement is needed. Use a
bearing scraping tool to smooth minute pits and raised
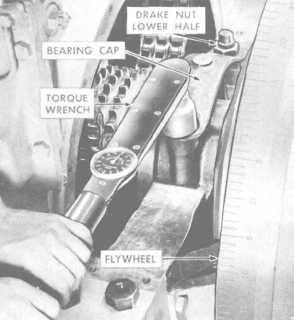
Figure 3-30.—Using a torque wrench to tighten a main bearing.
surfaces. After working on bearings, make every effort
to ensure that the bearing surfaces are clean. This also
applies to the bearing back and the connecting rod
journal Place a film of clean lubricating oil on the
journals and the bearing surfaces before you reinstall
them.
INSTALLING JOURNAL BEARINGS
Always check the markings of the lower and upper
bearing halves so you install them correctly. Many
bearings are interchangeable when new, but once they
have become worn to tit a particular journal they must
be reinstalled on that particular journal. You must mark
or stamp each bearing half with its location (cylinder
number) and the bearing position (upper or lower) to
prevent incorrect installation.
You must also pull the connecting rod bearing cap
nuts down evenly on the connecting rod bolts to prevent
possible distortion of the lower bearing cap and
consequent damage to the bearing shells, cap, and bolts.
Use a torque wrench (fig. 3-30) to measure the torque
applied to each bolt and nut assembly. Apply the same
torque to each bolt. If a manufacturer recommends the
use of a torque wrench, the specified torque will be listed
in the manufacturer’s technical manual.
Another method for pulling down the nuts evenly is
to stretch each bolt an equal amount and measure the
distance from end to end of the bolt before and after
tightening. Figure 3-31 shows the type of gauge used,
3-20


