When using dc straight or reverse polarity
welding current, the same motion is used for striking
the arc, but the electrode must come in contact with
the workpiece to start the flow of welding current,
unless the dc welder has high frequency to give it a
self-starting arc. When the arc has been struck,
withdraw the electrode approximately one-eighth
inch from the work surface to avoid contaminating
the electrode with the molten metal. To make the
weld bead, follow the same steps as described for ac
welding.
To stop an arc, snap the electrode quickly back
to the horizontal position. This must be done
rapidly so the arc will not damage the weld surface
or the workpiece.
You will find that welding technique improves
when you learn to weld in a comfortable position.
Quality welding is dependent upon smooth, even
manipulation of the torch and filler rod. This
cannot be accomplished if you are in an awkward or
uncomfortable position.
A common mistake often made by new
operators in GTA welding is improperly feeding the
filler rod into the arc. The arc heat should be used
to form and hold the molten pool, and the filler rod
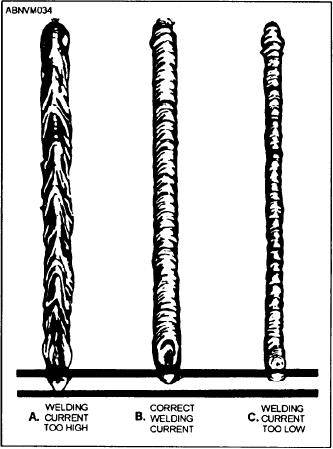
Figure 10-33.--Comparative GTA weld beads as determined
should be melted by the leading edge of the pool.
by electrical current.
In this way, the weld metal will always be fused into
the base metal of the workpiece. By watching the
Good weld bead appearance resulting from
edges of the weld pool, you can learn to judge the
using two different techniques of torch-filler rod
pool's fluidity, buildup, and fusion into the parent
manipulation is shown in figure 10-35. In view A, a
material. Incorrect torch angle, improper torch
bead was made using a two-step technique, namely,
manipulation, too high a welding current, or too low
intermittent filler rod addition to the weld pool and
a welding speed can cause undercutting in the base
intermittent torch movement. In view B, a bead was
plate along one or both edges of the weld bead.
made by moving the torch forward in a relatively
steady motion, feeding the filler rod intermittently
The surface appearance and etched cross
as the pool required it. This latter technique gives
sections of three weld beads on a flat plate are
improved weld bead appearance needing little or no
shown in figure 10-33.
finishing.
The welding current employed in each weld
You should practice making weld beads on a flat
determines its quality. The weld bead shown in
plate until you are satisfied with the workmanship.
view A indicates that the current selected for
In making satisfactory beads, practice is necessary to
welding is too high; view B indicates that the
develop a "steady hand." If the appearance of weld
welding current used is correct; and view C indicates
beads made are equivalent to the ones shown in
that the welding current is too low.
figure 10-36, and the sample proves satisfactory by
visual examination, you should continue on to the
Weld beads made with sufficient and insufficient
next exercise. Should the sample show evidence of
shielding gas are shown in figure 10-34. Insufficient
poor or careless workmanship with poor bead
shielding gas gives an unsound weld bead having a
appearance, spatter, or cracks, as indicated in figure
very poor appearance. Using too much shielding
10-37, you must practice until you make a weld bead
that will meet visual inspection requirements.
gas is wasteful.
10-33

