
percent, or an amount equal to one-fourth the thickness
of the stock.
Start the puddle in the usual way. As soon as the
puddle is formed, dip the filler rod into the middle of
the puddle. Oscillate both the filler rod and the torch
tip. The filler rod should be moved in a direction
OPPOSITE to the direction of movement of the flame.
When the flame is on one side of the puddle, the rod
should be on the other side. Stir the end of the rod in
the puddle, not above it. Do not direct the flame at the
end of the filler rod; the filler rod should be melted by
the puddle, not by the flame. Direct the flame so that
it preheats the weld area uniformly. The direction of
the flame is very important from the point of view of
Figure 8-31.--Welding a butt joint in the flat position.
obtaining good fusion and avoiding undercutting or
overlapping.
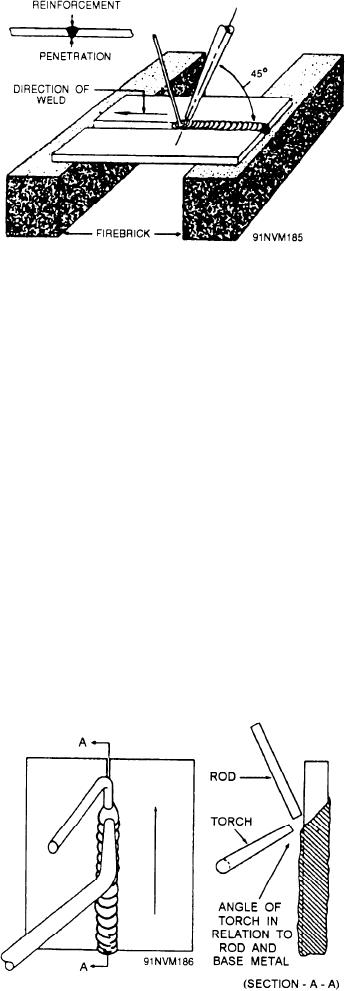
distribute it evenly along the joint. Bending the filler
Making a Butt Joint (Flat Position)
rod to an angle of 90, a short distance from the end,
makes it easier to get the end of the filler rod into the
Butt welding in the flat position is often used to
puddle. Figure 8-32 shows the positions of the torch
join sheet metal. First tack the two pieces of sheet
tip and the filler rod with respect to the base metal.
together, leaving a slight gap for a root opening. Be
sure the flame is correctly adjusted to a neutral or
Making a Butt Joint (Overhead Position)
slightly carburizing flame. Let the tacks cool, and then
start a puddle at one end.
When welding in the overhead position, you will
have to overcome the tendency of the molten metal to
The position of the torch tip and the filler rod must
drop down or to sag on the plate. Keeping the puddle
be just right to achieve the fusion and penetration
small helps to control the molten metal. If the molten
required for a good weld of this type. Hold the torch
puddle gets too large, remove the flame for an instant
tip at an angle of 45 to the base metal, as shown in
to allow the metal to freeze; then resume the welding.
figure 8-31. Apply the flame at the root of the joint,
first to one part of the joint and then to the other until
Figure 8-33 illustrates the welding of a butt joint
the side walls melt or break down to form a pool of
in the overhead position. Direct the flame so that it will
molten metal that bridges the gap between the plates
melt both edges. Add enough filler to keep the puddle
at the root. Add filler metal to the molten pool until the
the right size and to provide some metal for
pool is sufficiently large. Carry the puddle forward by
manipulating the torch with an oscillating motion. If
you weave the torch tip and the filler rod correctly, you
can carry along a molten puddle that will give
complete penetration and also provide enough filler
metal to reinforce the weld. Avoid overheating the
puddle; overheating can actually bum the metal and
thus greatly impair the strength of the finished weld.
Making a Butt Joint (Vertical Position)
When welding in the vertical position, you have
the problem of keeping the molten metal from running
down and accumulating at the bottom of the joint. To
control the flow of molten metal, hold the flame below
the filler rod. The flame should point upward at an
angle of 45 to the base metal. The gas pressure from
the torch tip will support the molten metal and
Figure 8-32.--Welding a butt joint in the vertical position.
8-24