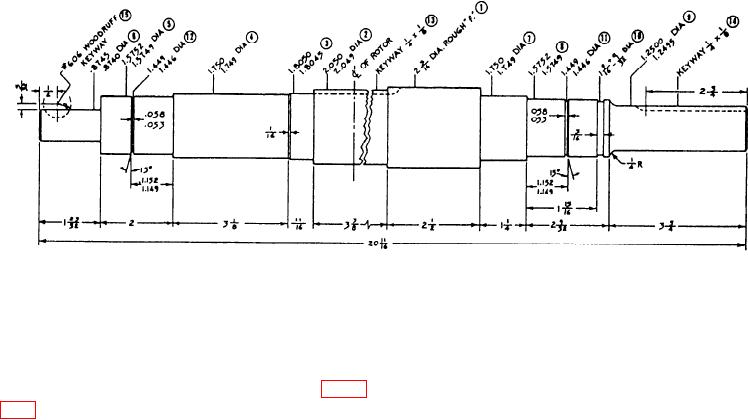
Figure 13-2.--Steps in making a shaft.
facing, be sure you face the workpiece to the correct
3. Use procedures similar to those described in
step 2 to machine surfaces 3 through 6. Be extremely
length for the shaft, which in this example is 20
careful to accurately measure the diameter of the
11/16 inches. Most of the linear dimensions in figure
beginning of each cut to ensure that you hold the
13-2 are given in the form of mixed numbers of proper
dimensions within the range provided in the illustration.
fractions; this indicates that you can use a rule to
measure the dimensions. However, the linear position
4. Turn the workpiece end-for-end and machine
of the grooves at numbers 11 and 12 are in decimal
surfaces 7, 8, and 9 as described in step 2.
fractions; you must measure these with an instrument
5. Set a 3/16-inch parting tool in the toolholder,
more accurate than a rule. When you manufacture a new
position the tool (by rule measurement) to make groove
shaft, you must take all linear dimensions from the same
10, and make the groove.
reference point to ensure the correct lengths.
6. Set the compound rest parallel to the axis of the
You can machine this particular shaft in two lathe
workpiece to lay out grooves 11 and 12. Place a sharp
setups and two mill setups. In the first lathe setup, do
pointed tool in the toolholder and align the point of the
the plain turning required on surfaces 1 through 6; then
tool with the shoulder between surfaces 7 and 8. Then
use the compound rest to move the tool 1.152 inches
machine surfaces 7 through 12 in the second lathe setup.
longitudinally as indicated by the micrometer collar on
Machine keyways 13 and 14 in the first milling setup;
the compound feed screw. Feed the tool toward the work
and then change the cutter to machine the Woodruff
with the crossfeed until a thin line is scribed on the
keyway (15). To machine the shaft, take the following
surface of the workpiece. Now swivel the compound
steps:
rest to the angle required to cut the chamfer, and cut the
1. Turn the workpiece to a 2 3/16-inch diameter.
chamfer. (Calculate the angular depth from the given
Check the diameter for taper and make corrections as
dimensions.) Then use a parting tool between 0.053 and
necessary.
0.058 inch wide to make the groove.
2. Set hermaphrodite calipers to 11 3/32 inches and
7. With a fine cut file, remove all sharp edges from
lay out the shoulder between the 2 3/16 inch diameter
shoulders and grooves.
and the 2.050 inch finish diameter. Using the crossfeed
8. Remove the shaft from the lathe, mount it in the
handwheel with the micrometer collar set on zero, feed
milling machine, and mill the keyways to the required
the tool in 0.068 inch (one-half of the difference
dimensions.
between 2.050 and 2 3/16). Make a short length of cut
at the end of the shaft and measure the diameter with a
Straightening a Shaft
micrometer. Adjust the crossfeed handwheel as
required to provide the 2.050 + 0.000 - 0.001 diameter
In many cases, bent shafts can be straightened so
and complete the cut to the layout line.
they have less than 0.001 inch runout. Before you try to
13-3

