meanings of these terms and the importance of
observing the distinction between them.
TOLERANCE
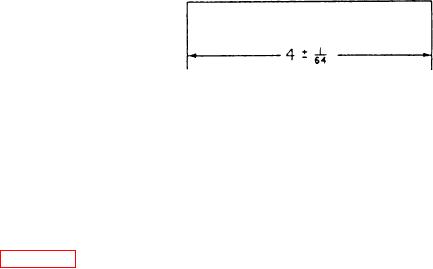
Figure 2-1.--Basic dimension and tolerance.
In most instances it's impractical and unnecessary
to work to the absolute or exact basic dimension. The
designer calculates, in addition to the basic
interference allowance of 0.001 inch. As the shaft is
dimensions, an allowable variation. The amount of
larger than the hole, force is necessary to assemble the
variation, or limit of error permissible, is indicated on
parts.
the drawing as plus or minus (+) a given amount, such
as 0.005 or 1/64. The difference between the
What is the relationship between tolerance and
allowable minimum and the allowance maximum
allowance? When you manufacture mating parts, you
dimension is tolerance. For example, in figure 2-1:
must control the tolerance of each part so the parts
will have the proper allowance when they are
Basic dimension = 4
assembled. Here's an example. A hole 0.250 inch in
Long limit = 4 1/64
diameter with a tolerance of 0.005 inch (0.0025) is
Short limit = 3 63/64
prescribed for a job. The shaft to be fitted in the hole
is to have a clearance allowance of 0.001 inch. You
Tolerance = 1/32
must finish the hole within the limits and determine
When tolerances are not actually specified on a
the required size of the shaft exactly before you can
drawing, you can make fairly concrete assumptions
make the shaft. If you finish the hole to the upper
concerning the accuracy expected, by using the
limit of the basic dimension (0.2525 inch), you would
following principles. For dimensions that end in a
machine the shaft to 0.2515 inch or 0.001 inch smaller
fraction of an inch, such as 1/8, 1/16, 1/32, 1/64, the
than the hole. If the dimension of the shaft was given
expected accuracy is 1/64 inch. When the
with the same tolerance as the hole there would be no
control over the allowance between the parts. As
dimension is given in decimal form, the following
much as 0.005-inch allowance (either clearance or
applies:
interference) could result.
If a dimension is given as 3.000 inches, the
accuracy expected is 0.0005 inch; or if the
To retain the required allowance and still permit
dimension is given as 3.00 inches, the accuracy
some tolerance in the dimensions of the mating parts,
expected is 0.005 inch. The +0.0005 is called in
the tolerance is limited to one direction on each part.
shop terms, "plus or minus five ten-thousandths of an
This single direction (unilateral) tolerance stems from
inch." The 0.005 is called "plus or minus five
the basic hole system. If a clearance allowance is
thousandths of an inch."
required between mating parts, the hole may be larger
but not smaller than the basic dimension; the part that
ALLOWANCE
fits into the opening may be smaller but not larger
than the basic dimension. Thus, shafts and other parts
Allowance is an intentional difference planned in
that fit into a mating opening have a minus tolerance
dimensions of mating parts to provide the desired fit.
only, while the openings have a plus tolerance only. If
A CLEARANCE ALLOWANCE permits movement
an interference allowance between the mating parts is
between mating parts when they are assembled. For
required, the situation is reversed; the opening can be
example, when a hole with a 0.250-inch diameter is
smaller but not larger than the basic dimension, while
fitted with a shaft that has a 0.245-inch diameter, the
the shaft can be larger but not smaller than the basic
clearance allowance is 0.005 inch. An INTER-
dimension. Therefore, you can expect to see a
FERENCE ALLOWANCE is the opposite of a
tolerance such as +0.005, -0, or +0, -0.005, but with
clearance allowance. The difference in dimensions in
the required value not necessarily 0.005. You can get
this case provides a tight lit. You would need force to
a better understanding of a clearance allowance, or an
assemble parts that have an interference allowance. If
interference allowance, if you make a rough sketch of
a shaft with a 0.251-inch diameter is fitted into the
the piece and add dimensions to the sketch where they
hole identified in the preceding example, the
difference between the dimensions will give an
apply.
2-2

