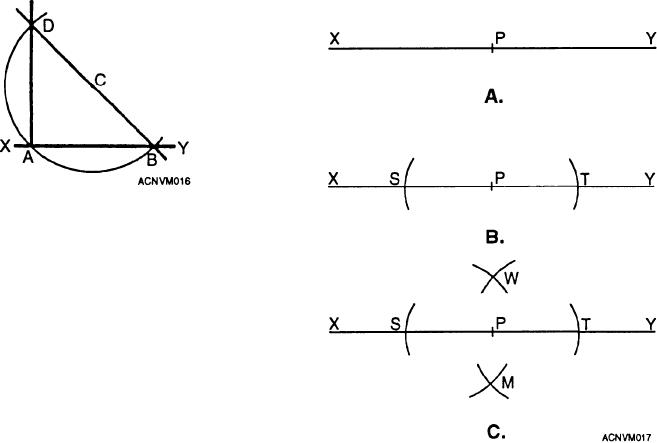
Figure 12-16.--Constructing a 90-degree angle at a given
point.
perpendicular, but you also bisected, or divided, line AB
into two equal parts.
2. Use a pair of dividers to CONSTRUCT A
RIGHT ANGLE AT A GIVEN POINT. You will find
this skill quite useful in making layouts. Figure 12-16
illustrates one method for constructing a right angle at
a given point.
Suppose you have line XY with A as a point at
which you need to erect a perpendicular to form a right
angle. Select a point within the proposed angle that you
wish to construct. In figure 12-16 that point is C. Set the
Figure 12-17.--Constructing a 90-degree angle by bisecting a
dividers equal to CA, and using that distance for a
line at a given point.
radius, swing an arc BAD with C as a center. Lay a
straightedge along the points B and C and draw a line
that will intersect the other end of the arc at D. Now,
stretchouts that are square or rectangular, such as a drip
draw a line connecting the points D and A and you have
pan or a box.
constructed a 90-degree angle.
TO LAY OUT A DRIP PAN WITH A PAIR OF
3. Figure 12-17 shows another way to construct a
DIVIDERS, you will need dividers, a scriber, a
perpendicular at a given point on a line:
straightedge, and a sheet of template paper. You know
Step 1: Take your dividers and place the point at
the length, width, and height or depth to which the pan
point B on line XY.
must be made. Now proceed as follows:
Step 2: Lay arcs on line XY at equal distances
Step 1. Draw a base line. (See fig. 12-18.) Select a
from B on line XY. These arcs become points S and T
point on this line for one corner of the drip pan layout.
on line XY.
Erect a perpendicular through this point to form a
Step 3: Before your next arcs are made, increase
90-degree angle (W in fig. 12-18).
the distance between your divider points. Set your
Now, measure off on the base line the required
divider point at S on line XY. Lay arcs directly above
length of the pan (L in fig. 12-18). At this point erect
and below P on line XY. These arcs become points W
another perpendicular. You now have three sides of the
and M. Repeat this procedure from T on line XY
without adjusting your dividers. You will have
stretchout. Draw the fourth side parallel to the base line,
intersecting arcs at W and M.
connecting the two perpendiculars that you have
erected. The fourth side will be drawn at a distance from
Now draw a perpendicular between the intersecting
the base line equal to the width of the drip pan.
arcs at W and M. You will have a right angle at B on
line XY.
Step 2. Now, set the dividers to mark off the depth
of the drip pan. You can use a steel scale to measure off
The three methods described in the preceding
paragraphs may be used to form 90-degree comers in
the correct radius on the dividers. Using each corner for
12-6

