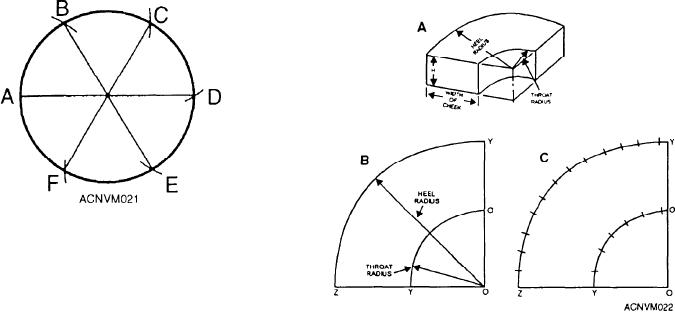
Figure 12-21.--Dividing a circle into six equal parts.
on the circumference for a beginning point. In figure
12-21, point A is selected for a beginning point. With
A as a center, swing an arc through the circumference
of the circle like the one shown at B in the illustration.
Figure 12-22.--Layout of a square or rectangular elbow.
Use B, then, as a point, and swing an arc through the
circumference at C. Continue to step off in this manner
sides of the elbow, the throat being the inside piece and
until you have divided the circle into six equal parts. If
the heel the outside piece. Set the dividers at exactly 1
the points of intersection between the arcs and the
inch, and step off the heel and throat arcs as shown in
circumference are connected as shown in figure 12-21,
view C of figure 12-22. If there is a distance of less than
the lines will intersect at the center of the circle, forming
1 inch left at the end of the arc, measure it with another
angles of 60 degrees.
pair of dividers or a scale. To make the stretchout of the
If you need an angle of 30 degrees, all you have to
heel and throat, lay out one piece of metal equal to the
do is to bisect one of these 60-degree angles by the
height of the elbow (H in view A, fig. 12-22) and equal
method described earlier in this chapter. Bisect the
in length to the number of steps taken with the dividers,
30-degree angle and you have a 15-degree angle. You
plus the fraction of an inch left over. One stretch out will
can construct a 45-degree angle in the same manner by
be the heel and the other the throat. You can assemble
bisecting a 9O-degree angle. In all probability, you'll
this elbow by welding, in which case you do not need
have a protractor to lay out these and other angles. But
to allow for tabs. But welding will cause a thin section
since you may not always have a steel square or
to warp, so you may need to use some of the other
protractor available, it's a good idea to know how to
standard methods for joining this type of work.
construct angles of various sizes and to erect
ALLOWING FOR EDGES
perpendiculars.
So far, your practice jobs have been laid out to be
LAY OUT A SQUARE OR RECTANGULAR
formed with the edges left as they are. Very few of your
ELBOW WITH A PAIR OF DIVIDERS. Take a look
jobs in the shop will actually be fabricated in this
at figure 12-22. View A shows you what the completed
manner. Edges are formed to improve the appearance
job should look like. Now, to make your layout for this
of the work, to strengthen the piece, or to eliminate a
job, draw the base line OZ shown in view B. Set the
raw edge that could cut someone. These edges may be
dividers for a distance equal to the width of the cheek.
formed from the metal itself by inserting wire or by
This distance forms the throat radius. This rule will not
attaching a band or angle iron. The kind of edge that you
always apply, as it must often be governed by the
will use on any job will be determined by the purpose,
amount of space available to make the turn with the
size, or strength of the edge needed.
elbow. Now, with O as a center, scribe the arc YU. To
get the heel radius, add the width of the cheek to the
The SINGLE-HEM EDGE is shown in figure
throat radius. Using 0 as a center, scribe the arc ZT.
12-23. This edge can be made in any width. In general,
These layouts, when cut, will form the cheeks, or sides,
the heavier the metal, the wider the hem is made. The
allowance for the hem is equal to its width (W in fig.
of the elbow. The next operation is to lay out the heel
12-23).
and throat pieces. These arc the other two of the four
12-8

