PATTERN DEVELOPMENT
If all work that you were assigned to do consisted
of laying out and fabricating drip pans, boxes, lockers,
and straight sections of cylindrical and rectangular
ventilation lines, your work would be much easier. Your
layout would consist of nothing more than straight-line
angular development, allowances for seams and edges,
and visualizing the notch needed. But you will have to
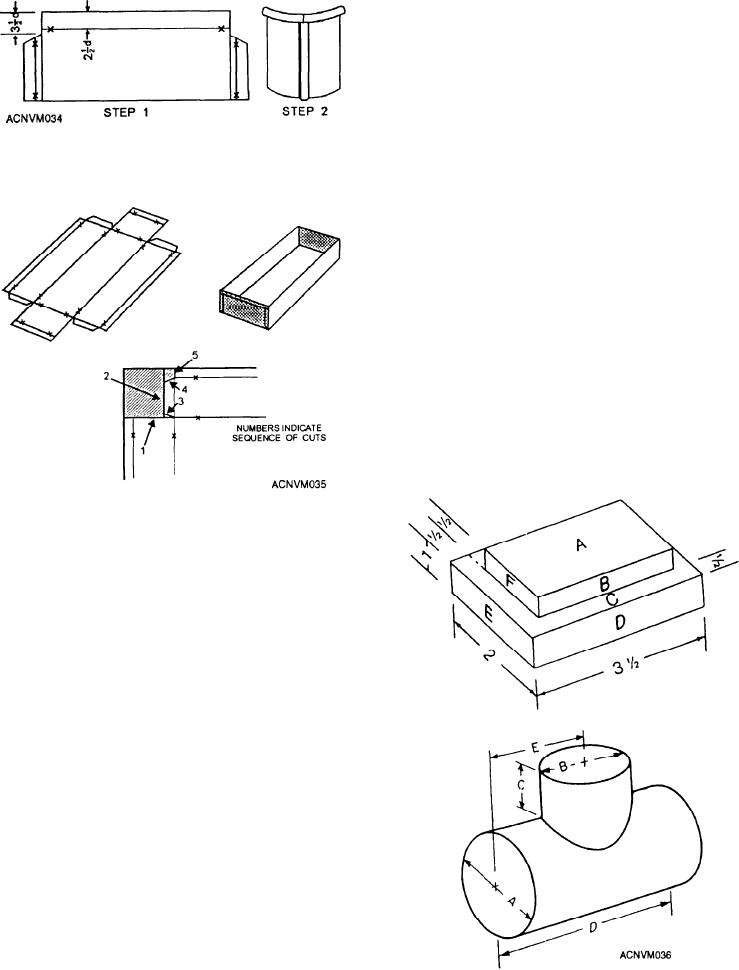
Figure 12-34.--Wire notch in cylindrical layout.
construct ventilation systems, or at least make repairs
to those systems. This work calls for elbows and tees,
which cannot be laid out unless you know how to do
parallel line development.
PARALLEL LINE METHOD
Parallel line development assumes that a line that is
parallel to another line is an equal distance from that
line at all points. The main lines of a structure to be laid
out by parallel line development are parallel to each
other. Objects that have opposite lines parallel to each
other, or that have the same cross-sectional shape
throughout their length, are developed by this method.
Figure 12-35.--Notching for an ice-cube tray.
A WIRE NOTCH is a notch used with a wired edge.
The wire-edge cut-back allowance from the edge of the
pattern will be one wire's diameter more than the depth
of the allowance for the wired edge (2 1/2d), or 3 l/2
times the diameter of the wire (3 1/2d). The allowance
on each side of the stretchout for the grooved seam is
equal to 1 1/2 times the width of the seam (1 1/2W).
That portion of the notch next to the wired edge will be
straight, as shown figure 12-34. The shape of the notch
on the seam will depend upon the type of seam used.
The grooved seam shown in figure 12-34 requires a
45-degree notch.
Most of your work will require more than one type
of notch. For example, in figure 12-34, notches are
required for the wired edge and the grooved seam.
You will find another combination of notches when
you lay out and make an ice-cube tray. The tray itself is
similar to the drip pan you have already laid out, but the
upper edge will require a wired edge. In this job, you
will have to use the wire notch, the modified V, and the
Figure 12-36.--Overall view of some objects fabricated by the
parallel line method.
square notch (fig. 12-35).
12-12

