An experienced burner can cut and bevel pipe at a
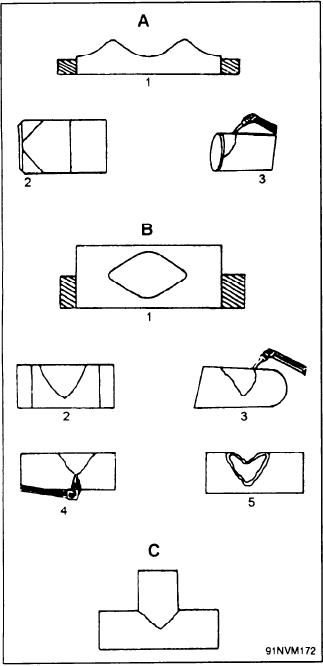
is to develop a pattern like that shown in figure 8-18,
45-degree angle in one operation; however, a person
view A, step 1. After the pattern is developed, it is
with little experience may have to do the job in two
wrapped around the pipe as shown in figure 8-18, view
steps. The first step is to cut the desired part at a
A, step 2. Be sure to leave enough stock so that the
90-degree angle. The second step is to bevel the edge
ends will overlap. Trace around the pattern with
of the cut to a 45-degree angle. When employing the
soapstone or a scriber. It is a good idea to mark the
two-step procedure, another line must be marked on
outline with a prick punch at about one-fourth-inch
the pipe. This second line follows the contour of the
intervals. When the metal is heated during the cutting
line traced around the pattern, but it is drawn away
procedure, the punch marks will stand out, making it
from the original pattern line at a distance equal to the
easier to follow the line of cut. Place the punch marks
pipe wall thickness. The first (or 90) cut in the
so that they will be removed during cutting. If punch
two-step procedure is made along the second line. The
marks are not removed, they provide notches from
second (or 45) cut is made along the original pattern
which cracking may start.
line. The two-step procedure is time consuming and
uneconomical in terms of oxygen and acetylene
consumption.
When you are experienced enough to use the
one-step cutting and beveling procedure, you will find
that it is not complicated. However, both a steady hand
and a great deal of practice are necessary to turn out a
first-class job. The one-step procedure for cutting and
fabricating a T is shown in figure 8-18. View A of
figure 8-18 outlines the step-by-step procedure for
producing the branch; view B shows the steps for
preparing the other section of the T; and view C shows
the assembled T, tack welded and ready for welding.
Figure 8-18, view A, step 3, shows the procedure for
cutting the miter on the branch. The cut is started at the
end of the pipe and worked around until one-half of
one side is cut. The torch is manipulated so that at all
times the tip is at an angle of 45 to the surface of the
pipe along the line of cut. While the tip is at a 45-degree
angle, the torch is moved steadily forward and at the
same time the butt of the torch is swinging upward
through an arc. This torch manipulation is necessary
to keep the cut progressing in the proper direction and
to produce a bevel that will be 45 at all points on the
miter. The second portion of the miter is cut in the same
manner as the first.
The torch manipulation necessary for cutting the
run of the T is shown in steps 3 and 4 in view B of
figure 8-18. Step 3 shows the torch angle for the
starting cut. At step 4, the cut has progressed to the
lowest point on the pipe. Here the angle has been
changed to get around the sharp curve and start the cut
in an upward direction. The completed cut for the run
is shown in step 5 in view B of figure 8-18.
Before the parts of any fabricated fitting are
assembled and tack welded, be sure to clean the fit of
the joint. The bevels must be smooth to allow complete
fusion when the joint is welded.
Figure 8-18.--Fabricating a T fitting.
8-16

