13. With a as the radius and points 4 as the pivot
points in the pattern, scribe your arcs establishing
points 5.
14. Set your dividers to the length of line b in step
3. Now, using points 5 as the pivot points in the pattern,
scribe your arcs at 6.
15. Set your dividers for the distance between 4
and 6 in the full plan. Using points 4 in the pattern as
your final pivot points, scribe your arcs to establish
points 6.
16. Draw straight lines between the established
points, as shown in figure 12-5 1. Make your necessary
allowances for the seams, and the pattern is completed.
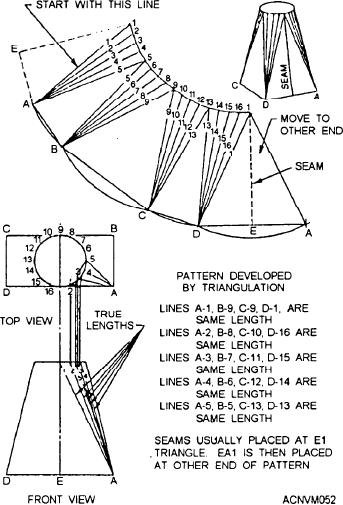
Figure 12-52 illustrates the procedure for the
development of a RECTANGULAR-TO-ROUND
transition piece.
This is also a relatively easy development, and one
that you can make on your own by following the
drawing.
T h e OFFCENTER ROUND-TO-ROUND
transition piece developed in figure 12-53 is a scalene
conic section.
When the difference between the diameters of the
top and bottom is small, as it often is, the vertex--if you
could establish it--would fall in the next stop. When
you have a scalene conic section to develop and that
Figure 12-52.--Development of rectangular-to-round
condition exists, you will have to develop the piece by
transition piece.
the triangulation method. This type of development is
shown in figure 12-53.
Now find the true length of each side of the
To develop the pattern, first draw the orthographic
triangles. The short side of each triangle that points
front view. Then swing in the half-circles at the top and
downward is equal to one-twelfth the circumference of
the bottom. With the front view completed, follow these
the TOP circle. The other two sides of each triangle are
steps:
not shown in true length. Therefore, we must use
1. Divide the top half-circle into six equal parts to
triangulation to determine their true lengths. However,
establish points A, B, C, D, and E.
lines 1-8 and 7-14 are shown in their true length on the
2. Drop vertical lines from these points to intersect
front view.
the top line of the front view at right angles. Number
Work with the solid lines first. (See the top portion
these points of intersection 1 through 7.
of fig. 12-53.) Set up two right angles to use as bases
3. Divide the bottom half-circle into six equal parts
for true-length diagrams and work from point X and
to establish points F, G, H, J, and K.
point Y. Take line 3-10 as an example. Set your dividers
4. Run vertical lines upward to intersect the bottom
to the length of line 3-10 on the front view. Use point X
line of the front view at right angles. Number these
as a center and swing an arc across line XZ. Then set
points of intersection 8 through 14.
the dividers equal to the DIFFERENCE between line
G-IO and line B-3. Use X as a center and swing the arc
5. Construct the front view triangles as shown.
to intersect line XY. A line connecting the two
Note that some of the lines are solid and some are
intersections is the true length of line 3-10.
broken. Make your lines the same way.
12-22

