Before you reinstall a good camshaft, remove the
minor surface defects on the cams and the camshaft by
using crocus cloth or a fine stone.
INSPECTING, MAINTAINING, AND
REPLACING PISTON RINGS AND PISTONS
The following paragraphs are general procedures
for inspections, maintenance, and replacement of piston
rings and pistons. You must consult the manufacturer’s
technical manual for specific instructions.
PISTON RINGS
Over a period of time all piston rings wear. Some
stick and may even break. While you may be able to free
stuck rings and make them serviceable, you must
replace excessively worn or broken rings with new ones.
The installation of a new set of rings in an engine
requires great care. Most of the damage that is done
occurs when the rings are being placed in the grooves
of a piston or when the piston is being inserted into the
cylinder bore.
Be very careful when you remove the piston and
connecting rod from the cylinder. In most engines, you
should not remove a piston from a cylinder until you
have scraped the cylinder surface above the ring travel
area. In addition to removing all carbon, you must
remove any appreciable ridge before removing the
piston. Do not remove a ridge by grinding, as this will
allow small abrasive particles from the stone to enter the
engine. Use a metal scraper and place a cloth in the
cylinder to catch all metal cuttings. You can usually
scrape enough from the lip of a cylinder to allow the
piston assembly to slide out of the liner. After removing
the piston, you can make a more detailed inspection of
the ridge.
Finish scraping the remaining ridge, but be careful
not to go too deep. Finish the surface with a handstone.
For large ridges, you may need to remove the liner and
use a small power grinder.
With the piston and connecting rod removed, check
the condition and wear of the piston pin bushing, both
in the piston and in the connecting rod.
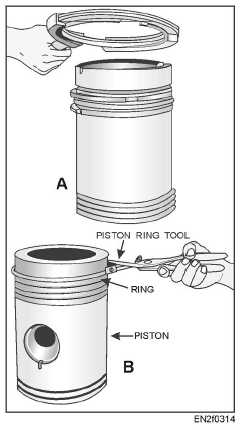
The best way to remove and install piston rings is
with a tool similar to that shown in figure 3-19. These
tools generally have a device that limits the amount the
ring can be spread and prevents the rings from being
deformed or broken.
A ring that is securely stuck in the groove will
require additional work. You may need to soak the piston
Figure 3-19.–Piston ring tools used for removal or installation.
overnight in an approved cleaning solvent or in diesel
oil. If soaking does not free the ring, you must drive it
out with a brass drift. The end of the drift should be
shaped and ground to permit its use without damage to
the lands.
After removing the rings, thoroughly clean the
piston with special attention to the ring grooves. (Diesel
oil or kerosene are satisfactory cleaning agents.) In
addition, you may need to clean excessive deposits from
the oil return holes in the bottom of the oil control ring
grooves with a twist drill of a diameter corresponding
to the original size of the holes.
Make another complete inspection after cleaning
the piston. Check all parts for any defects that could
require replacement of the piston. Give particular
attention to the ring grooves, especially if the pistons
have been in service for a long period of time. A certain
amount of enlargement of the width of the grooves is
normal, and SHOULDERING of the groove may occur.
Shouldering, as illustrated in figure 3-20, results from
the “hammering out” motion of the rings. The radial
depth of thickness of the ring is much less than the
groove depth, and while the ring wears away an amount
of metal corresponding to its own width, the metal at the
bottom of the groove remains unchanged. Shouldering
3-14


