The principal cause of burned exhaust valves is
small particles of carbon that lodge between the valve
head and the valve seat. These particles come from
incomplete combustion of the fuel or oil left by the
piston rings in the cylinder. The particles hold the valve
open just enough to prevent the valve head from
touching the valve seat. The valve is cooled by several
means, including its contact with the valve seat. When
carbon particles prevent contact, the heat normally
transferred from the valve head to the seat remains in
the valve head. The valve seat seldom burns because the
water jackets surrounding the seat usually provide
enough cooling to keep its temperature below a
dangerous point.
When cleaning carbon from cylinder heads, remove
all loose particles from the crevices; be extremely
careful that you do not nick or scratch the valve or seat.
Removing the valves from the engine will make it easier
to clean the passages and remove the carbon deposits
from the underside of the valve heads.
Check the tappet clearance adjustments at frequent
intervals to be certain they are correct and that the
locking devices are secure. The adjustment of valve
clearances is discussed later in this chapter.
Most engines are equipped with valve seat inserts
made of hard, heat-resisting, alloy steel. Occasionally, a
seat will crack and allow the hot gases to leak, burning
both the insert and the valve. Sometimes a poor contact
between the valve seat insert and the counterbore
prevents the heat from being conducted away, and the
high temperatures deform the insert. When this occurs,
both the seat and the valve will burn; the seat insert must
be rep1aced.
LOOSE VALVE SEATS
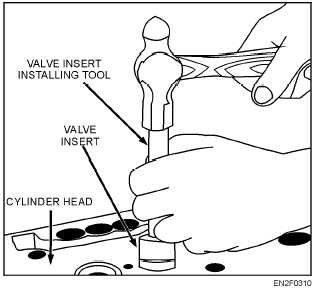
You can avoid causing loose valve seats only by
installing them properly. Clean the counterbore
thoroughly to remove all carbon before shrinking in an
insert. Chill the valve seat with dry ice and place the
cylinder head in boiling water for approximately 30
minutes; then drive the insert into the counterbore with
a valve insert installing tool, as illustrated in figure 3-10.
Never strike a valve seat directly. Do the driving
operation quickly, before the insert reaches the
temperature of the cylinder head
When replacing a damaged valve with a new one,
inspect the valve guides for excessive wear. If the valve
moves from side to side as it seats, replace the guides.
Figure 3-10.–Driving a valve iusert into the cylinder head
counterbore.
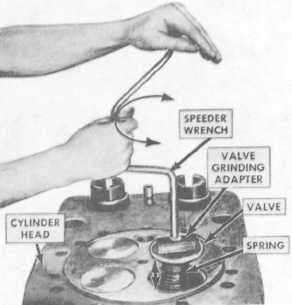
PITTING
If the valve seat is secured firmly in the counterbore
and is free of cracks and burns, you may remove slight
damage such as pitting by hand grinding (fig. 3-11).
Generally, you will use prussian blue to check the valve
and valve seat, but if this is not available, use any thin
dark oil-based paint. Allow the valve to seat by dropping
it on the valve seat from a short distance. If the surfaces
fail to make complete contact, regrinding is necessary.
75.72
Figure 3-11.–Hand grinding a valve and valve seat.
3-9