
TM 55-2815-574-24
0103
CLEANING AND INSPECTION - Continued
4.
Inspect all remaining parts for wear, cracks or distortion. Replace damaged parts.
END OF TASK
ASSEMBLY
1.
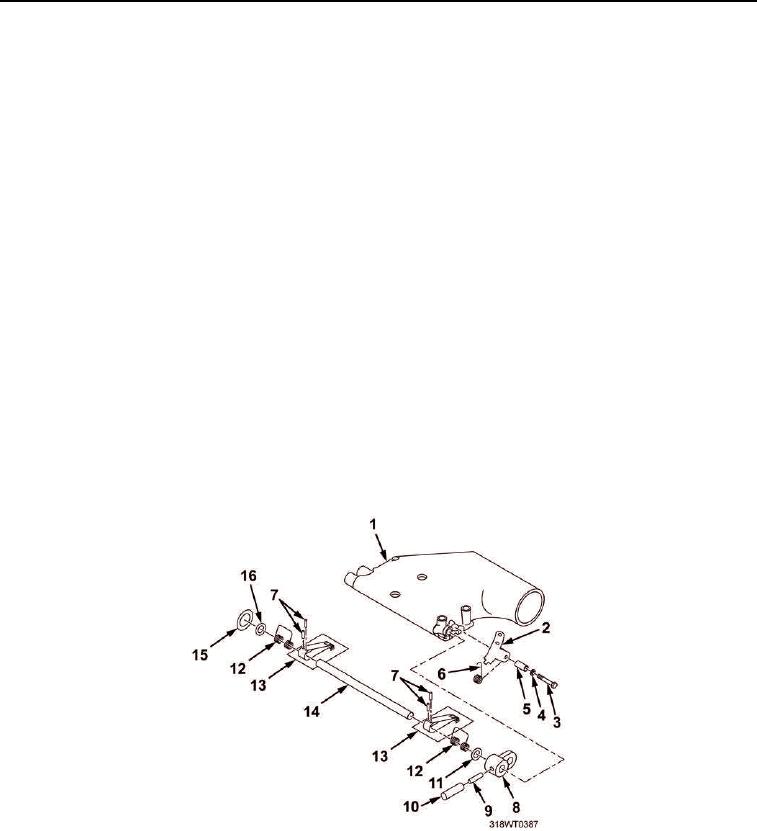
Install washer (Figure 4, Item 15) in air intake housing (Figure 4, Item 1).
2.
Install ring seals (Figure 4, Items 11 and 16) on cam end of shaft (Figure 4, Item 14).
3.
Install cam (Figure 4, Item 8) on shaft (Figure 4, Item 14).
4.
Install retaining pin (Figure 4, Item 9) and handle (Figure 4, Item 10) on cam (Figure 4, Item 8).
5.
Using grease, lightly lubricate shaft (Figure 4, Item 14).
6.
Position two springs (Figure 4, Item 12) and valve assemblies (Figure 4, Item 13) in air intake housing
(Figure 4, Item 1) in same position as noted during disassembly.
7.
Install shaft (Figure 4, Item 14), through air intake housing (Figure 4, Item 1), going through springs
(Figure 4, Item 12) and valve assemblies (Figure 4, Item 13).
8.
Verify shaft end (Figure 4, Item 14) sits firmly in air intake housing (Figure 4, Item 1).
9.
Install four pins (Figure 4, Item 7) in each valve assembly (Figure 4, Item 13) to secure to shaft
(Figure 4, Item 14).
10.
Install bolt (Figure 4, Item 3), washer (Figure 4, Item 4), bushing (Figure 4, Item 5), latch (Figure 4, Item 2),
and spring (Figure 4, Item 6) in air intake housing (Figure 4, Item 1).
Figure 4. Springs and Valves.
END OF TASK